What is TWRP Recovery ?
Android devices have a menu we call “Recovery”. TWRP is an advanced Touch Recovery menu that gives us many options. It allows you to do many things, such as flashing different ROMs on your device, making a backup of your device, and restoring those backups. Stock Recovery menus often have a restricted features. It only gives us some options, such as resetting and updating to the device.
How to use TWRP?
1. Boot screens / screens that may appear when TWRP is first opened
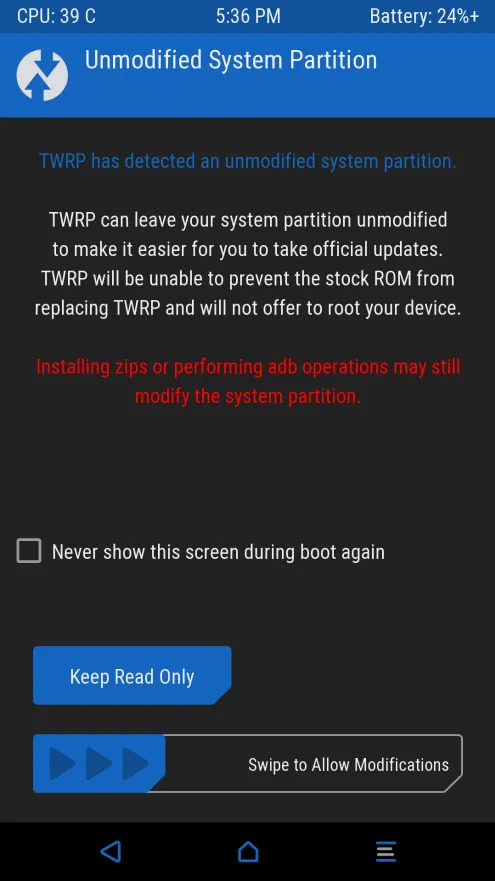
Keep System Read Only
This screen asks if you allow your phone to change the system partition on this screen. The reason it does this is that if you change the system partition, it can prevent you from getting OTA, or system updates. If you press the “Keep Read Only” button here, TWRP will not allow you to change the system partition and prevent it. If you press the “Swipe to Allow Modifications” button, you can modify the system partition.
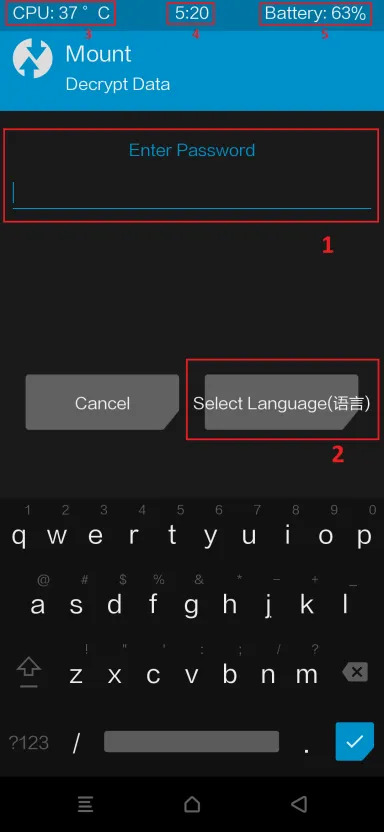
Enter Password / Decrypt
This screen is the screen that requests you to enter a password so that you can access your information. If you do not enter your password on this screen, you cannot access the files in your memory.
Button 1: The section where we will enter our password
Button 2: Section where we can change the language of TWRP
3. This is the section that shows the instant temperature value of our processor.
4. This is the section showing the time
5. This is the section that shows our instant battery level
TWRP Main Menu

- This is the section that shows us the version and producer of TWRP we are using.
- Install button, option to flash various zip files, roms and image files.
- Wipe button is the part where we can wipe specific partitions or memory of the phone / change file systems.
- Backup button, the part where we took backup.
- Restore button is the section where we restore the backups we took.
- Mount button is the section where we determine which sections are flashable.
- Settings button, the section where the settings of the TWRP are located.
- Advanced button have a File Manager, ADB sideload, and Install Root in some TWRPs.
- Reboot button is the section where we restart the phone in different modes (recovery, fastboot etc.).
- Navigation buttons.
Install Button

It is the screen that we will see when we press the Install button. Here is the screen where we see and flash various zip files (roms, mods, etc.). Button 1 is the button we choose which section to display. For example, if SD card or OTG is inserted in our phone, we can press this button and switch to that section and upload the files. The 2nd button, the Install Image button, is the section that allows us to upload various image files instead of zip files.

This is the screen we will see when we want to load a zip file. Option 1 is the marking we check whether the zip file we will upload is signed / not signed. The second option is marking whether we automatically restart the phone after the zip files we want to load are loaded. Button number 3 allows us to upload multiple zip files in a row. Button number 4 allows us to clear the zip’s in the queqe. Scroll bar number 5 is used to start the process (flashing) of the selected zip.

This is the part we see when we press the “Install Image” button. Here, after selecting the image file we want to upload, we choose which partition to upload and start the flashing process.
Wipe Button
This section is the section where we make the phone resets. Advanced Wipe is the section where we can choose which partitions to delete. Format data erases the /data partition and removes the encryption by completely resetting our memory. The third scroll bar is to return to the factory settings we all know.

Advanced Wipe

Dalvik / ART Cache: It works like a Prefetch folder in Windows. It caches the applications you open and allows you to open applications faster. Deleting Dalvik / ART Cache does not harm the phone. When you turn on the phone and start using the apps, the first openings are a bit slower than before, but there is no problem as the cache will be rebuilt.
Data: Clears the phone / data partition. This partition contains apps and application data.
Internal Storage: Cleans the phone’s memory.
Cache: Clears logs and cache.
System: Deletes the system. If you do not install a new ROM after deleting this part, the device will not turn on.
USB-OTG: Clears the USB you insert from OTG.
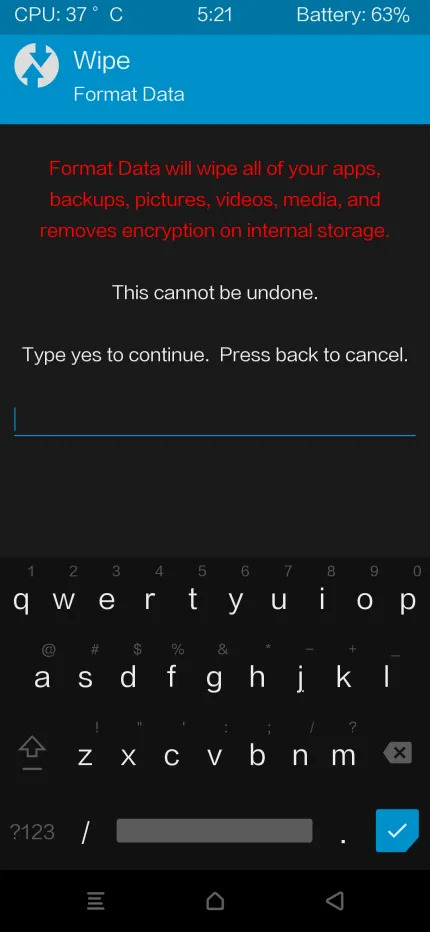
Format Data
This section is the section where we delete the phone’s memory + applications as we explained above. When we write “yes” in the space that exists without any quotes and press the blue tick in the bottom right, it performs the reset process. This section also removes the encryption on your device.
Backup Button
The backup section is the section where we take the backups. To start the backup process, simply select the partitions we want and slide the Swipe to Backup bar below. The Select Storage button is for us to choose which part (main memory, sd card, usb) we will save the backups to.
Restore Button
Restore section is the partition where we restore the backups we took from the Backup section.
Mount Button
Mount section is the section where we choose which partitions can be read / written. If we do not mount any partition, we will not be able to take any action on that partition.
Settings Section
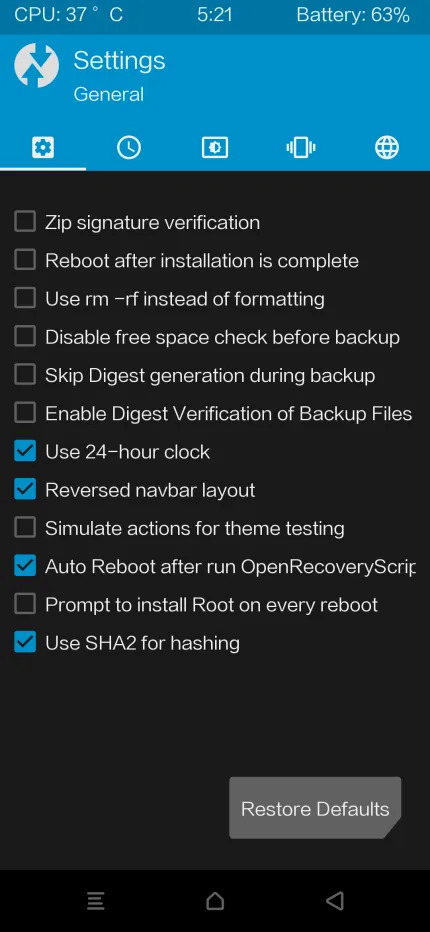
Use rm -rf instead of formatting: This option comes from the rm command on Linux systems. In Unix-like systems, “rm” command is used to delete something. “Rm -r” command means formatting it as “recursive”. In other words, it does not just delete the partition you want to delete, it will delete the partition completely and recreate it. I do not recommend you choose it as it may cause problems in file systems.
Disable free space check before backup: If you select this option, the device does not waste time to calculate free memory before starting a backup and starts the backup process directly. But you should do this when you are sure there is space in your storage, so it is recommended that it be disabled.
Skip digest generation during backup: Digest is actually an MD5 verification. If you look at the detailed description of MD5, you can better understand this option. It is recommended not to mark.
Enable digest verification during backup: If you checked the option above, this option will be disabled. If you have not checked the function above, it does not make sense. Therefore, it is recommended to mark it. It compares the verification file with your backups and ensures that it is not corrupted.
Use 24-hour clock: It allows you to use the top clock on the name in 24 slices instead of 12 slices.
Reversed navbar layout: Moves back and menu icons in the navigation bar.
Simulate actions for theme testing: TWRP is a customizable recovery menu. If you are designing a theme for TWRP and wondering how the theme looks in different menus, you can turn on this option. The transactions you make do not actually happen, they are only simulated.
Auto reboot after run OpenRecoveryScript: This option should remain on.
Prompt to install root on every reboot: Each time you reboot the phone from TWRP, it asks if you want to install root permissions.
Use SHA-2 for hashing: Hash means encryption in its simplest terms. SHA-2 is an encryption algorithm. It is recommended to remain open.
Advanced Section

Note: This section may differ depending on the version of TWRP you are using. Some options may not be available on your TWRP.
ADB Sideload: This feature comes with Android Jelly Bean. It allows you to upload various zip files to your device with ADB command.
Terminal: Our terminal, similar to the CMD screen in Windows, where we can run various commands.
File Manager: It is the incoming file manager inside TWRP.
Reload Theme: If we have installed any theme etc, we can make this changed item appear by pressing this button.
Fix Contexts: Detailed article about.
Install Root: Gives root authority to your device.
Unroot: Removes root from your device.
RM Forceencrypt: It does the same thing as the Forceencrypt Disabler we mentioned in the TWRP guides. Deletes encryption.
Restore Stock Rec: Restores the Stock (original) recovery file to the device.
Sign Boot: functions same as fastboot –disable-verity –disable-verification command. Disables Verity.
RM Battery-info: Deletes the file where the battery information is kept.
Reboot Section
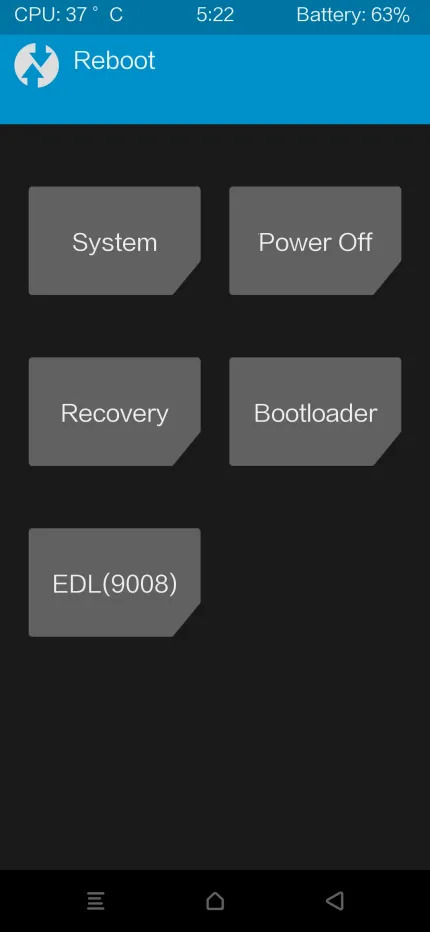
System: Restarts the device.
Power Off: Turns off the device.
Recovery: Restarts the device in recovery mode.
Bootloader: Restarts the device in fastboot mode.
EDL (9008): Restarts the device in EDL mode.
– Some devices may also have buttons to change your active slot here.
MAKECOMMENT