Table of Contents
TL;DR
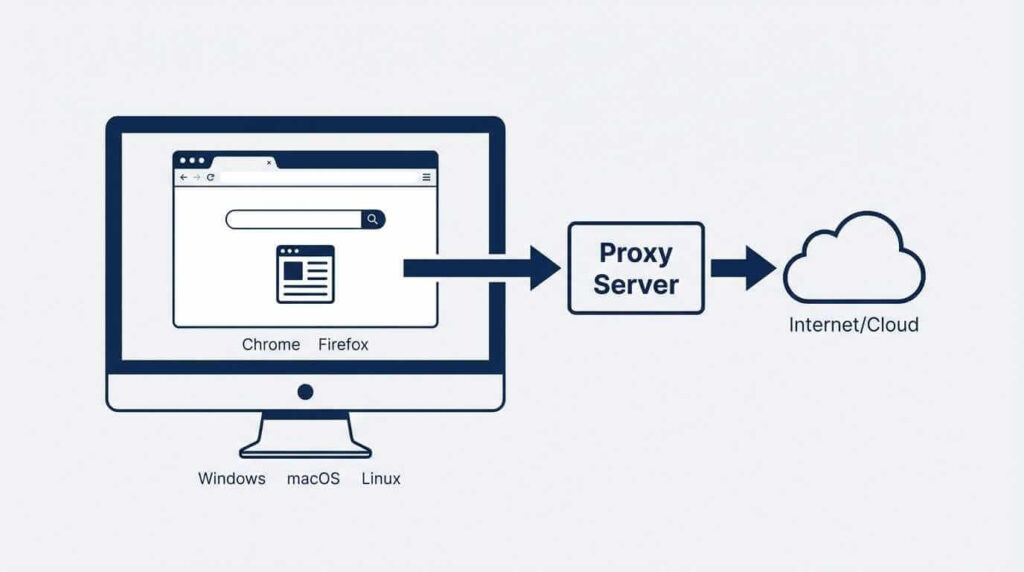
This guide shows how to configure proxies on desktop computers (Windows 11, macOS, and Linux), including browser-level setups and app-specific cases like Git, npm, and Docker.
It also covers the difference between HTTP/HTTPS and SOCKS5 proxies, plus quick ways to verify everything works (IP check + DNS leak testing).
For Android/iPhone proxy setup, follow the dedicated phone guide instead (mobile configuration is usually handled separately).
Introduction
Most people think proxies are for hackers.
They think it’s complicated. They think it requires coding knowledge. They think it’s sketchy.
They think wrong.
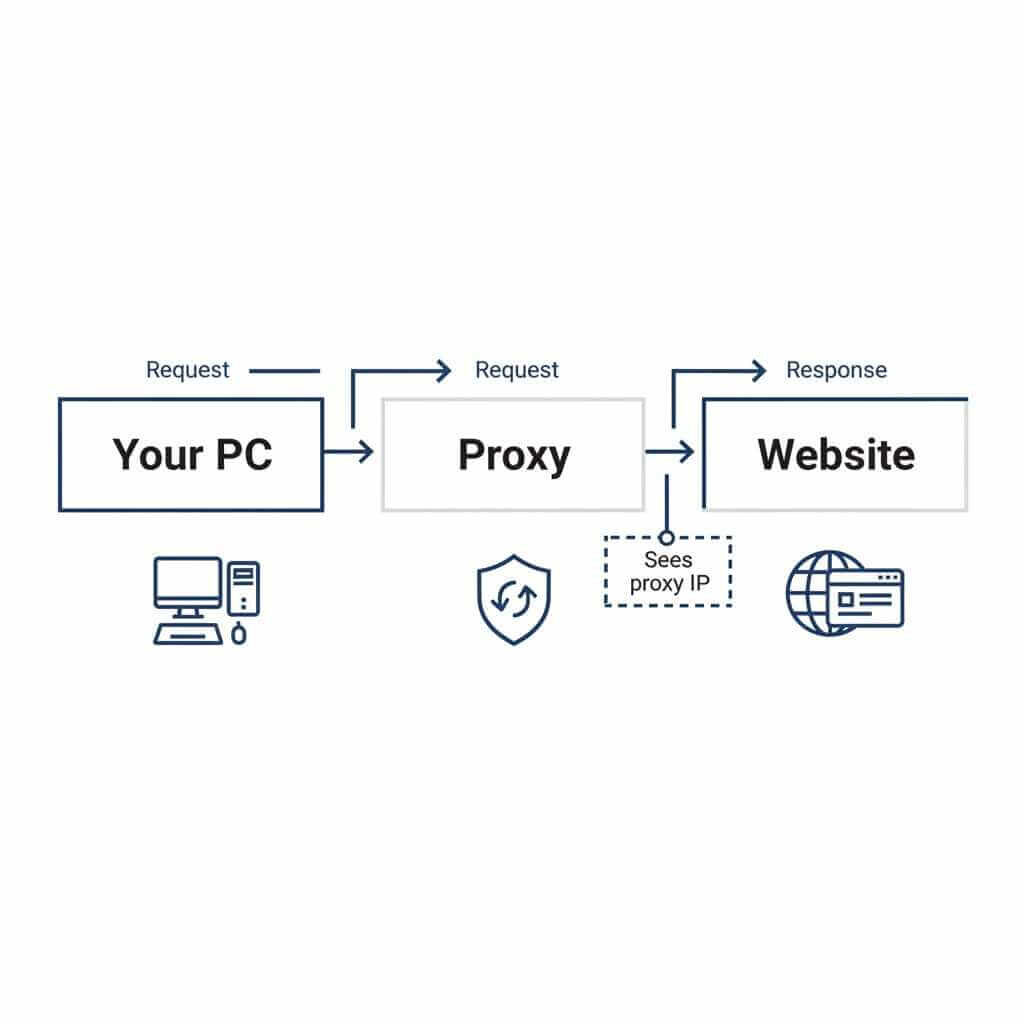
Proxies are just middlemen. Your computer talks to the proxy. The proxy talks to the internet. The internet never sees your real IP address.
That’s it. No dark magic. No command-line wizardry required.
Whether you want privacy, access to geo-blocked content, or you’re running a business that needs multiple IP addresses — proxies solve the problem.
Here’s how to set them up on literally everything.
Why would you even want a proxy?
Before we dive into setup, let’s address the obvious question: Why bother?
Privacy: Your IP address is basically your home address on the internet. Every website you visit logs it. Your ISP sees everything you do. A proxy hides your real IP behind someone else’s.
Geo-restrictions: That streaming service only available in the UK? A UK proxy makes the internet think you’re sitting in London. Same content. Different virtual location.
Web scraping: If you’re pulling data from websites for research or business, you’ll get blocked fast using a single IP. Rotate through proxies, and you look like thousands of different users.
Security on public WiFi: Coffee shop networks are hunting grounds for packet sniffers. A proxy adds a layer between your data and whoever’s lurking on the network.
Work requirements: Some companies require proxy connections for remote access. If your IT department gave you proxy details, you need to know where to enter them.
The use cases are endless. The setup? Surprisingly simple.
The two types of proxies you need to understand
Not all proxies work the same way. Before configuring anything, you need to know what you’re working with.
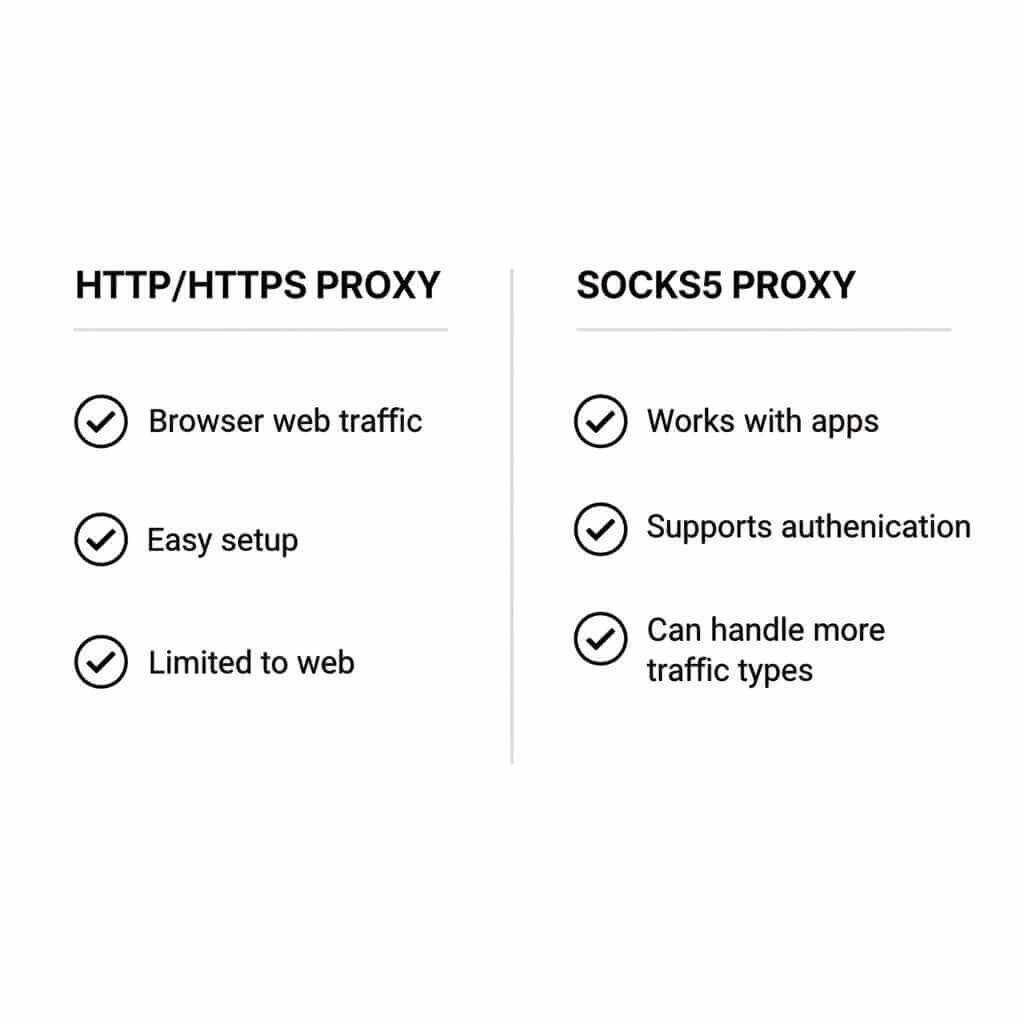
HTTP/HTTPS Proxies
These handle web traffic. Browser stuff. When you visit a website, an HTTP proxy sits between your browser and the server. Most consumer proxy services sell these.
They’re easy to set up. They work in browsers. They don’t touch anything else on your system.
SOCKS Proxies (SOCKS4/SOCKS5)
SOCKS proxies are more versatile. They work at a lower network level, which means they can handle any type of traffic — not just web browsing.
Gaming. Torrenting. Applications that aren’t browsers. SOCKS5 handles all of it.
SOCKS5 also supports authentication and UDP traffic, making it the superior choice for most use cases. If you have the option, choose SOCKS5.
What you need before starting
To configure a proxy, you’ll need four pieces of information:
- Proxy server address — This looks like an IP address (192.168.1.1) or a domain (proxy.example.com)
- Port number — Common ports are 8080, 3128, or 1080 for SOCKS
- Username (if required) — Paid proxies usually require authentication
- Password (if required) — Goes with the username
If you’re using a proxy service, they’ll provide all of this in your dashboard. Write it down. You’ll need it repeatedly.
Using proxies on a phone? Mobile proxy setup works differently than desktop—Android can be configured on Wi‑Fi (and sometimes via APN for cellular), while iPhone typically supports proxy setup per Wi‑Fi network and has limitations around SOCKS5 without third‑party apps. If you’re on Android or iPhone, follow the dedicated step‑by‑step guide here: How to Use Proxies on Android & iPhone (Complete Setup Guide).
Setting up proxies on Windows 11
Windows has built-in proxy settings that apply system-wide. Here’s how to configure them.
For automatic proxy setup:
- Open Settings. Click Network & Internet. Select Proxy from the sidebar.
- Under “Automatic proxy setup,” you can either use a setup script (if your company provided one) or let Windows detect settings automatically.
Most people don’t need this. Skip to manual setup.
For manual proxy setup:
- Same path: Settings → Network & Internet → Proxy.

Windows 11: where the proxy settings live. - Scroll down to “Manual proxy setup.” Click the “Set up” button next to “Use a proxy server.”
- Toggle the switch to On.
- Enter your proxy address and port number. If your proxy is 192.168.1.100 with port 8080, enter exactly that.
- Check the box that says “Don’t use the proxy server for local addresses” unless you have a reason not to.
- Click Save.
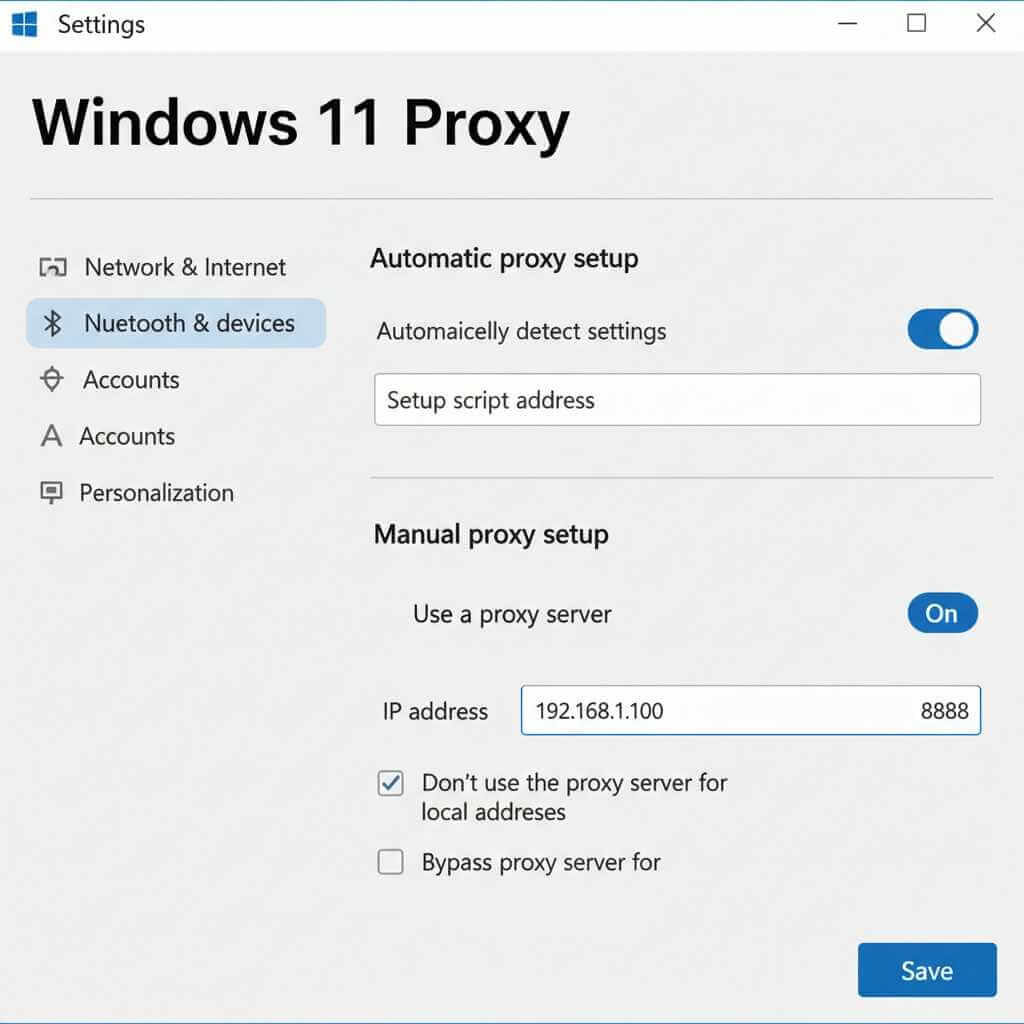
That’s it. Windows will now route your internet traffic through that proxy.
The catch? Windows’ built-in proxy settings only work for HTTP/HTTPS. If you need SOCKS5, you’ll need to configure it per-application or use third-party software.
Setting up proxies on macOS
Apple makes this surprisingly straightforward.
- Open System Settings (or System Preferences on older versions).
- Click Network in the sidebar.
- Select your active connection — WiFi or Ethernet.
- Click “Details” next to your connected network.
- Select “Proxies” from the sidebar.
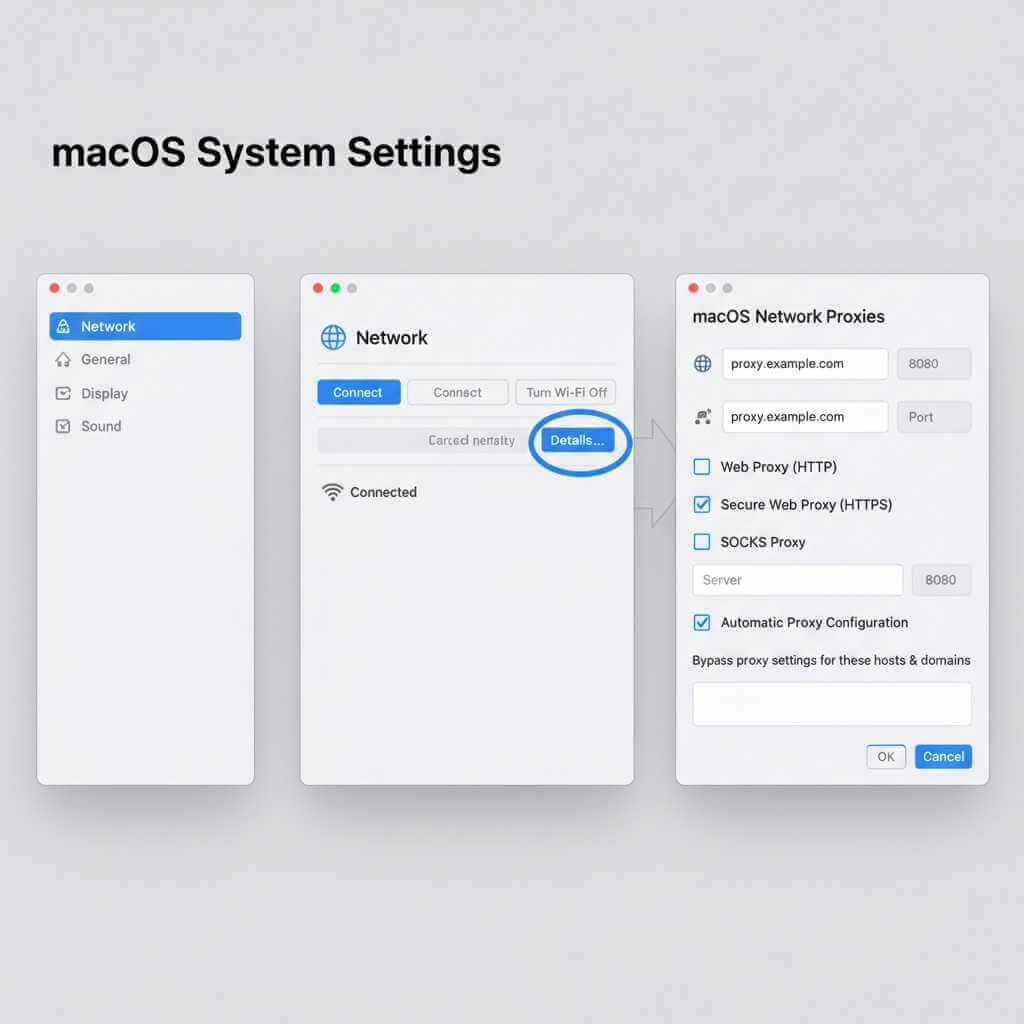
You’ll see a list of proxy types:
- Web Proxy (HTTP)
- Secure Web Proxy (HTTPS)
- SOCKS Proxy
Check the box next to the type you want to configure.
Enter your proxy server address and port.
If authentication is required, check “Proxy server requires password” and enter your credentials.
Click OK, then Apply.
Your Mac will now route traffic through the proxy. Test it by Googling “what’s my IP” — you should see the proxy’s IP address, not yours.
Setting up proxies on Linux
Linux gives you more control. And more ways to mess things up. Here’s the straightforward approach.
For system-wide proxy (GNOME/Ubuntu)
- Open Settings. Navigate to Network. Click on Network Proxy.
- Select “Manual” from the dropdown.
- Enter your HTTP, HTTPS, and SOCKS proxy details in the respective fields.
Changes apply immediately. No restart required.
For terminal/command-line proxy
This is where Linux shines. You can set proxy environment variables that apply to terminal applications.
Open your terminal. Add these lines to your ~/.bashrc or ~/.zshrc file:
export http_proxy=”http://username:password@proxy_address:port”
export https_proxy=”http://username:password@proxy_address:port”
export ftp_proxy=”http://username:password@proxy_address:port”
export no_proxy=”localhost,127.0.0.1″
Replace the placeholders with your actual proxy details.
Run source ~/.bashrc to apply changes.
Now commands like curl, wget, and apt will use your proxy automatically.
For applications that ignore system settings
Some Linux apps need proxy settings configured within the application itself. Check the app’s preferences for network or proxy settings.
Browser-specific proxy setup
Sometimes you don’t want system-wide proxy settings. You just want one browser to use a proxy while everything else stays normal.
This is actually the most common use case.
Google Chrome
Chrome uses your system’s proxy settings by default. No way to configure a separate proxy within Chrome itself.
The workaround? Use an extension.
Search the Chrome Web Store for proxy extensions. Popular options include “Proxy SwitchyOmega” — it lets you create profiles, switch between proxies instantly, and set rules for which sites use which proxy.
Install it. Click the extension icon. Add your proxy details. Switch it on.
Done. Chrome now uses your proxy while the rest of your system doesn’t.
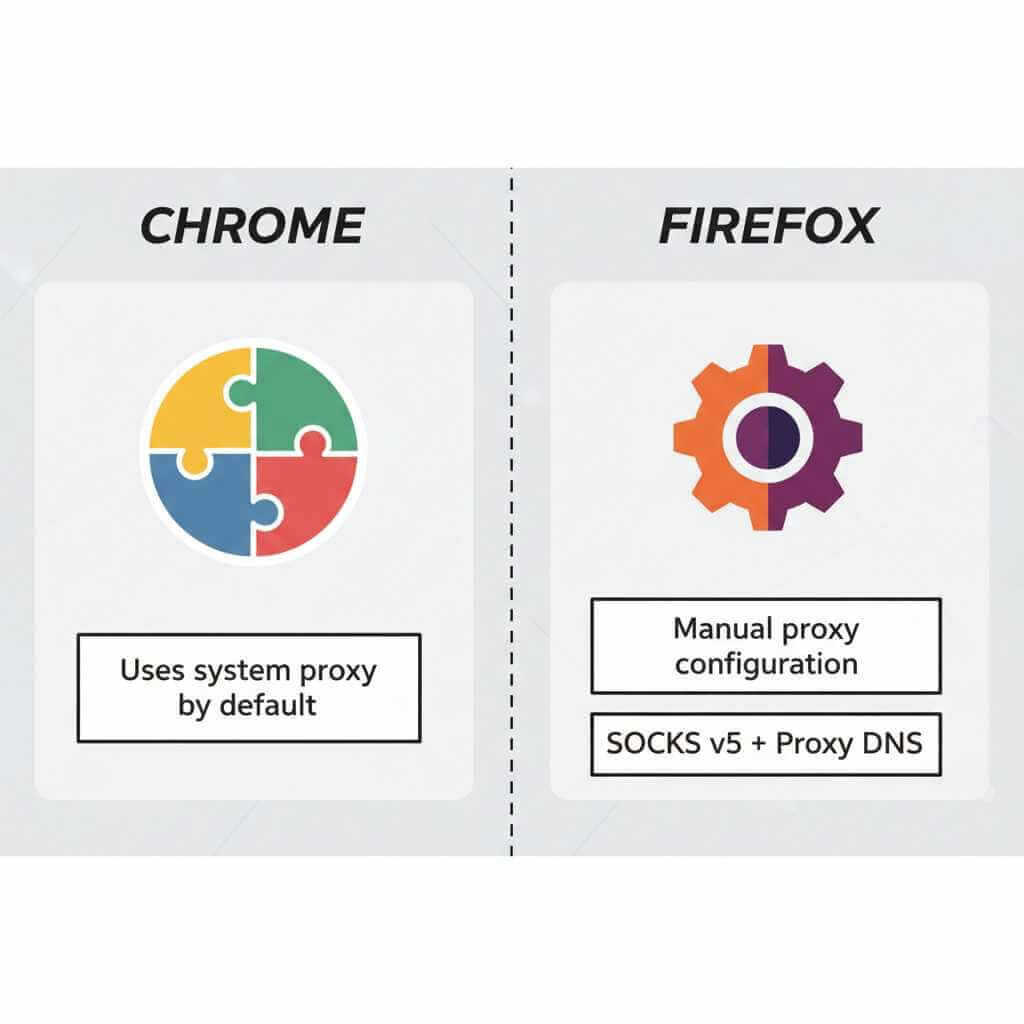
Mozilla Firefox
Firefox has built-in proxy settings. This is one reason privacy enthusiasts love it.
- Open Firefox. Click the menu (three horizontal lines). Select Settings.
- Scroll down to “Network Settings” and click “Settings.”
- Choose “Manual proxy configuration.”
- Enter your HTTP Proxy and Port. For HTTPS traffic, check “Also use this proxy for HTTPS.”
- If you’re using SOCKS5, enter it in the SOCKS Host field. Select “SOCKS v5.” Check “Proxy DNS when using SOCKS v5” — this prevents DNS leaks.
- Click OK.
Firefox now routes all its traffic through your proxy, completely independent of your system settings.
Microsoft Edge
Like Chrome, Edge uses Windows system proxy settings. No built-in alternative.
Use an extension from the Edge Add-ons store, or configure Windows proxy settings (which will affect Edge).
Safari
Safari uses macOS system proxy settings exclusively. Configure proxies in System Settings → Network → Proxies.
No extensions. No workarounds. Apple’s walled garden at work.
Setting up proxies in specific applications
Some applications need their own proxy configuration. System settings don’t touch them.
Git
If you’re behind a corporate proxy and can’t clone repositories, configure Git directly:
git config –global http.proxy http://username:password@proxy:port
git config –global https.proxy http://username:password@proxy:port
To remove:
git config –global –unset http.proxy
git config –global –unset https.proxy
npm
Node package manager has its own proxy settings:
npm config set proxy http://proxy:port
npm config set https-proxy http://proxy:port
Docker
Create or edit /etc/systemd/system/docker.service.d/http-proxy.conf:
[Service]
Environment=”HTTP_PROXY=http://proxy:port”
Environment=”HTTPS_PROXY=http://proxy:port”
Environment=”NO_PROXY=localhost,127.0.0.1″
Reload and restart Docker:
sudo systemctl daemon-reload
sudo systemctl restart docker
Slack, Discord, Spotify, and other desktop apps
Check each application’s settings for proxy options. Most modern apps include a “Network” or “Connection” section in preferences.
If they don’t, they likely respect system proxy settings. Configure your OS proxy, and the app should follow.
Using a proxy manager for sanity
If you’re juggling multiple proxies — different ones for different tasks — manually switching settings becomes exhausting.
Proxy managers exist for this reason.
Proxifier (Windows/macOS)
Proxifier forces any application to use a proxy, even ones that don’t support proxy settings. It works at the system level, intercepting connections and routing them through your configured proxy.
Set up rules: “Route Discord through Proxy A. Route Chrome through Proxy B. Everything else goes direct.”
It’s not free ($40 lifetime license), but it’s the most powerful option for desktop proxy management.
ProxyCap
Similar to Proxifier. Works on Windows and macOS. Supports SOCKS5 and SSH tunneling.
Charles Proxy
More of a debugging tool, but incredibly useful for developers. Intercepts all HTTP/HTTPS traffic, shows you exactly what’s happening, and lets you route through external proxies.
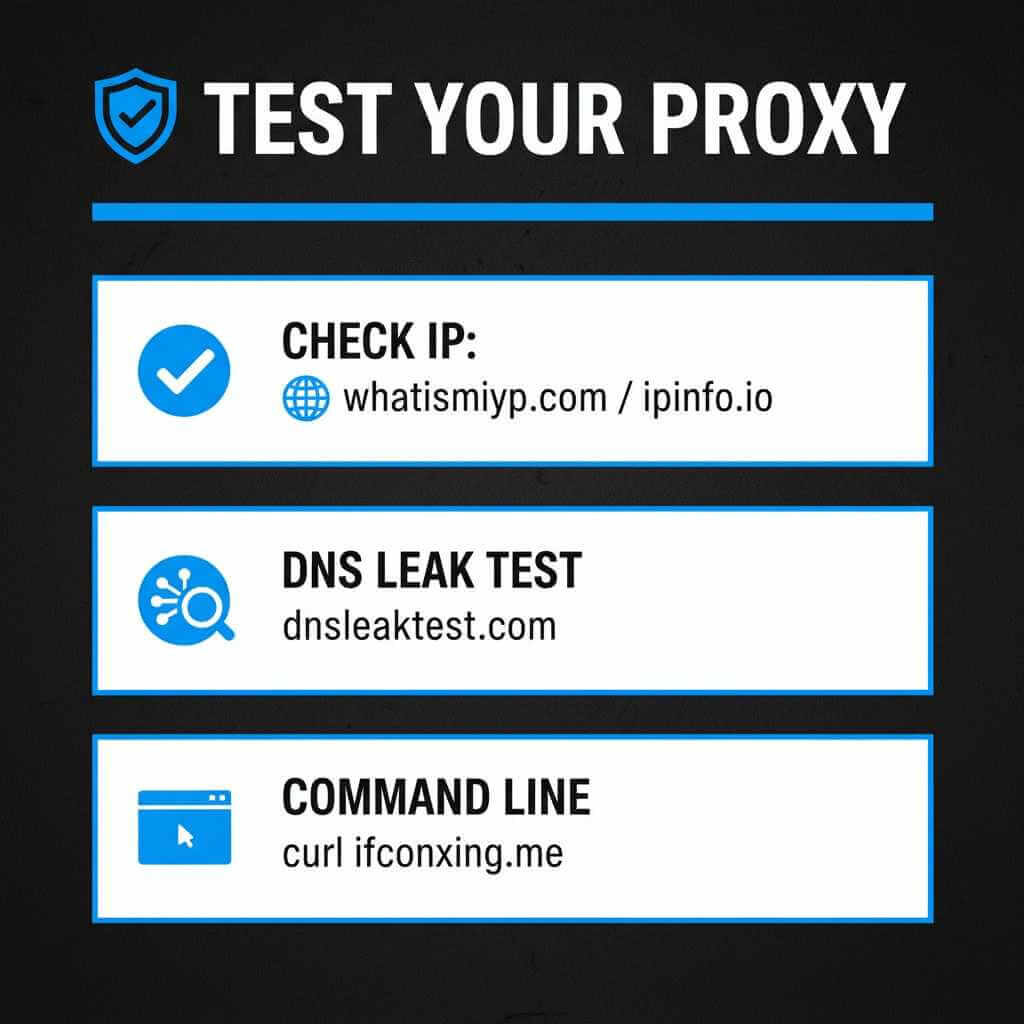
Testing your proxy setup
You configured everything. Does it actually work?
Method 1: IP checker websites
Visit whatismyip.com or ipinfo.io. If you see the proxy’s IP address instead of your real one, it’s working.
Method 2: DNS leak test
Go to dnsleaktest.com. Run the extended test. If you see your ISP’s DNS servers, you have a leak. Your proxy is routing traffic but not DNS requests.
Fix: Use the proxy’s DNS servers, or configure DNS-over-HTTPS.
Method 3: Browser developer tools
Open DevTools (F12). Go to the Network tab. Load a page. Check the request headers. You might see proxy-related headers that confirm routing.
Method 4: Command line
Run curl ifconfig.me in your terminal. It returns your public IP. Should show the proxy IP if configured correctly for terminal applications.
Common problems and fixes
“Proxy refusing connections”
Either the proxy is down, your credentials are wrong, or you’ve got the address/port incorrect. Double-check everything. Try the proxy details in a different application to isolate the issue.
“Some sites work, others don’t”
The proxy might be blocking certain domains, or those sites might be blocking the proxy’s IP range. Try a different proxy server.
“Incredibly slow speeds”
Free proxies are notoriously slow. Everyone’s using them. Paid proxies offer dedicated bandwidth. You get what you pay for.
“Can’t access local network resources”
Your system is trying to reach local devices through the proxy. Add localhost, 127.0.0.1, and your local network range (192.168.x.x) to the “bypass” or “exceptions” list in your proxy settings.
“Proxy works in browser but not other apps”
Those apps don’t respect system proxy settings. Configure them individually, or use Proxifier to force traffic through the proxy.
Free vs. paid proxies: The honest truth
Free proxies exist. Thousands of them.
Should you use them? Probably not.
Here’s why:
- Speed: Free proxies are shared by everyone. You’re competing for bandwidth with potentially thousands of other users. Expect slow speeds and frequent timeouts.
- Reliability: They go down constantly. That proxy working today might be dead tomorrow. You’ll spend more time finding new proxies than actually using them.
- Security: This is the big one. Free proxy operators can see your traffic. Some actively log it. Some inject ads. Some harvest credentials.
If you’re doing anything sensitive — logging into accounts, transmitting personal data — a free proxy is a terrible idea.
Paid proxies cost money. But they offer dedicated IPs, consistent speeds, actual customer support, and operators who have financial incentive to not be malicious.
For casual use — bypassing a simple geo-block, testing something quickly — free proxies work fine.
For anything serious, pay the money.
Proxy FAQ
Q1: What is a proxy server?
A proxy server is a middleman between your device and the internet: your computer connects to the proxy, and the proxy forwards requests so websites see the proxy’s IP instead of yours.
Q2: Do I need HTTP/HTTPS or SOCKS5?
HTTP/HTTPS proxies handle browser web traffic only, while SOCKS5 works at a lower level and can route almost any app (gaming, torrents, custom clients). If you have the choice, SOCKS5 is usually the more flexible option for desktop use.
Q3: Does a proxy encrypt my traffic like a VPN?
Most standard proxies do not fully encrypt all traffic like a VPN; they mainly change or hide your IP and optionally tunnel specific protocols. For strong privacy on public Wi‑Fi, combining HTTPS everywhere with a reputable provider matters more than just using any free proxy.
Q4: How do I check if my proxy works?
Visit an IP checker website (such as whatismyip.com) and confirm it shows the proxy IP instead of your real one. For extra safety, run a DNS leak test (for example, dnsleaktest.com) to ensure your DNS requests are not exposing your ISP.
Q5: Why is my proxy so slow?
Free proxies are often overloaded, so bandwidth is shared across many users, causing high latency and timeouts. Distance to the proxy server and poor network routes can also slow down speeds, so switching to a closer or paid server usually helps.
Q6: Are free proxies safe to use?
Many free proxies log traffic, inject ads, or can potentially harvest credentials because they see unencrypted data that passes through them. For anything involving logins or sensitive information, a paid, reputable provider is strongly recommended.
Q7: How do I turn a proxy off again?
On Windows, macOS, and most Linux desktops, you can disable proxies by returning to the system network/proxy settings and toggling off manual configuration or clearing proxy fields. In browsers or apps (Chrome extensions, Firefox, Git, npm, Docker), remove the proxy values or switch the profile back to “no proxy” / system default.
The Bottom Line
Proxies aren’t complicated. They’re just settings.
Four pieces of information. Server, port, username, password. Enter them in the right places. Traffic reroutes.
System settings handle most use cases. Browser extensions handle the rest. Dedicated proxy managers handle the complex stuff.
The learning curve isn’t technical. It’s knowing where each operating system hides its proxy settings. Now you know.
Start with browser-level configuration. Get comfortable. Then move to system-wide settings when you need them.
Privacy. Access. Security. Control.
All from a middleman server that speaks on your behalf.
Set it up once. Forget about it. Let your proxy do the talking.