We have long since moved away from the days when a phone video barely filled a few megabytes. iPhones and Android devices now shoot in 4K, sometimes even higher, and the quality is impressive enough to rival dedicated cameras. The catch? File sizes have exploded. A short clip that once fit in a few MB now easily stretches into hundreds of MB, or even several gigabytes, depending on how long you record.
That means your iPhone or Android storage fills up far faster than you’d like. Deleting videos is one option, but not the smartest. A better choice is to compress videos on iPhone or Android so they take up less space while still looking good. With compression, you make room for new clips, apps, or files without losing the old memories.
In this guide, I’ll walk you through tested methods to reduce video size on iPhone and Android (because I don’t want to leave users of one or the other without solutions). I personally tested and searched for different options, and here I will share only those methods that I actually used and found effective. I won’t recommend anything I wouldn’t rely on myself.
Also Read: iPhone Red Mode: How To Use It for Better Night Vision
What Benefits Will You Get from Compressing Videos?
Before I show the options on how to compress a video on iPhone or Android, I want to stop at a few points and explain what benefits you actually get as a result. Compression is not just some “for fun” trick, it has very practical value.
- Videos are among the heaviest files on your phone. A couple of 4K clips can eat up gigabytes in no time. By compressing them, you immediately free up storage on iPhone or Android. That means more room for apps, music, photos, or if you’re like me, another dozen videos you’ll shoot tomorrow.
- And even if you don’t struggle with storage, compression still pays off. Smaller files send faster. Whether you’re emailing a clip, sharing in WhatsApp, or using AirDrop, you won’t wait ages for the progress bar to crawl to the end.
- Not everyone has the luxury of unlimited data. A single 4K clip can burn through your plan before you realize it. Shrinking the size of your videos helps cut down on mobile traffic, which is especially handy if you’re often away from Wi-Fi and depend on cellular data.
- And when it comes to Instagram, TikTok, or YouTube, the platforms themselves don’t go easy on big files. They’ll compress your video anyway, usually with worse results. If you do it yourself first, you get to decide the balance between quality and file size. That way your uploads finish faster and still look sharp.
So, the point is simple, compression pays off. Whether you’re low on space or just want things to move faster, it makes your life easier. Now let’s move on to the methods.
How to Compress Video on iPhone and Android
Now we can get straight to the methods. As I mentioned earlier, I tested these options myself and only kept the ones that actually make sense. That’s why I’m not going to suggest something like “just cut the video.” Come on, what’s the point? You shot that moment for a reason, and trimming the start or finish doesn’t make much sense. On top of that, cutting a few seconds off won’t magically free up hundreds of megabytes anyway.
So in this section, I’ll only show you methods that truly work to reduce file size while keeping your video intact. Let’s go.
Method 1: Use Special Video Compression Applications
In my opinion, the most convenient way to compress a video is through dedicated apps. The App Store and Play Store are full of them. These apps usually work by lowering the bitrate or frame rate. Some make it clear in the settings and let you choose, while others just do everything under the hood without telling you much. But honestly, as a user, I don’t really care what exactly happens there. What matters is the result — a video file that takes up less space and still looks good enough to keep.
Let me show you the apps I picked out for iPhone and Android. They’re not the same (I couldn’t find a single universal solution that works equally well on both systems), but each does its job properly on its platform.
Read More: Top 5 Android Apps for Video Editing
1.1 Use an App to Compress iPhone Videos
I tested a bunch of popular iPhone apps, and honestly, most of them drove me crazy. You can download them for free, but the moment you try to use the compression feature, a paywall pops up. And if it’s not that, you’re bombarded with endless ads you can’t skip. It was a nightmare until I stumbled on Clever Cleaner.
This one turned out to be exactly what I was looking for: completely free, no ads, no hidden traps. Just download and use (this might change in the future. On their website, the developers mention that anyone who downloads the app now will keep it free even if they add paid options later, so better grab it while you can).
When it comes to compressing iPhone videos, everything is done in just a few taps:
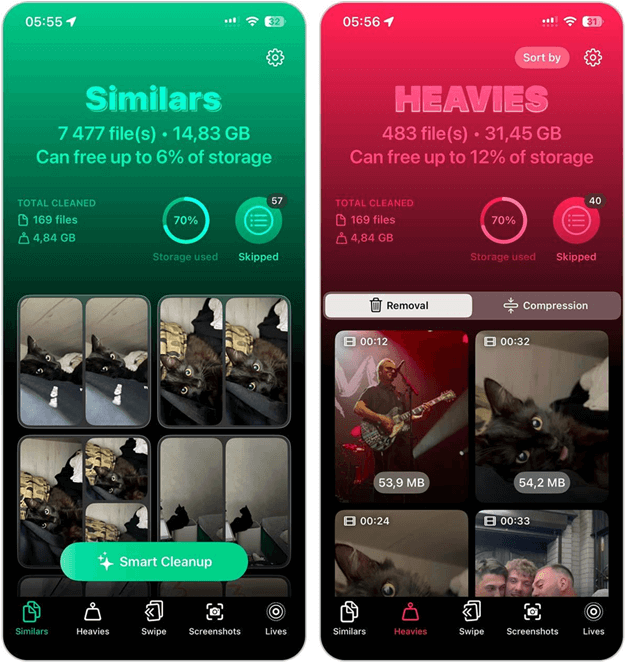
- Download Clever Cleaner from the App Store.
- Open it and allow full access to your Photos app. The app will scan your library in a few seconds.
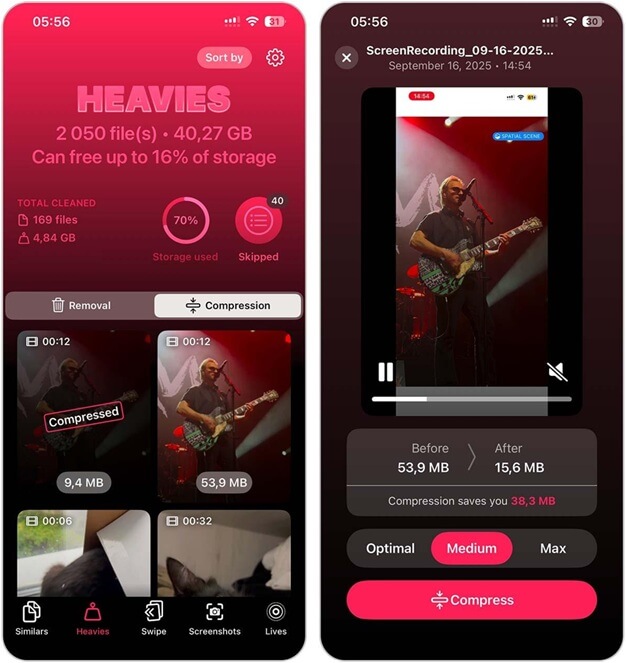
- By default, the Similars tool opens. Instead, tap Heavies on the bottom panel.

How to Compress Video on iPhone - The app shows you the Removal option first, but you need the Compress.
- Select the video you want to compress. Tap it, and you’ll see three options: Optimal, Medium, and Max. Each shows how many MB you’ll save.
- Pick the level you want, then hit Compress
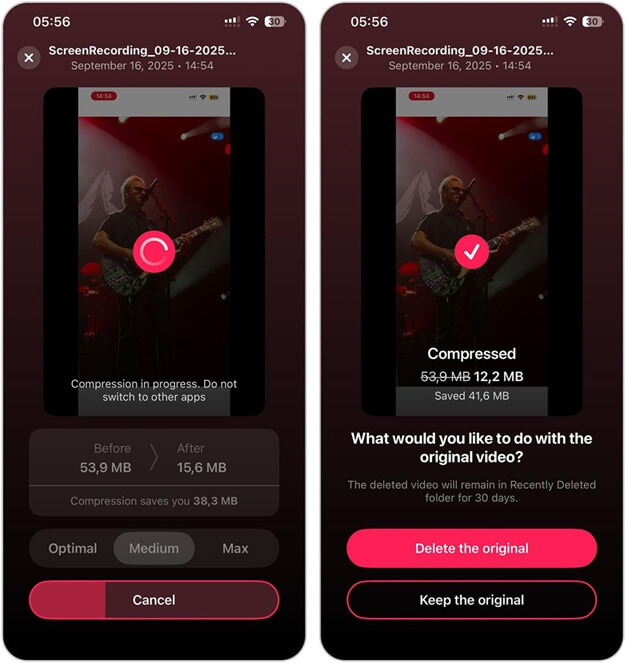
Clever Cleaner - In seconds, the app processes the video and asks what to do with the original — keep it or delete it. Done. Just repeat the process for the other videos you want to compress.
Compress iPhone Video What I also liked is that Clever Cleaner isn’t just about compressing iPhone video. It packs in several other useful tools:

- Similars – finds duplicates and similar photos that iPhone’s built-in utility misses.
- Swipe – groups photos by month and lets you keep or delete them with quick swipes, almost like a mini-game.
- Screenshots – shows all your screenshots in one place so you can clear them fast.
- Lives – converts Live Photos into regular stills, which is handy if, like me, you often forget to turn off Live mode.
So that’s the iPhone solution I settled on. Now let’s move on to the app I chose for Android.
1.2 Use an App to Compress Videos on Android
On Android, the situation turned out to be a little simpler. Sure, there are apps that push you toward subscriptions, and some show ads. But the difference is that most ads on Android are placed in blocks within the interface, not in a way that interrupts the whole process. That, I can live with. After trying a few options, I settled on Panda Video Compressor. It’s nothing fancy, but it does its job without unnecessary complications.
Here’s how it works:
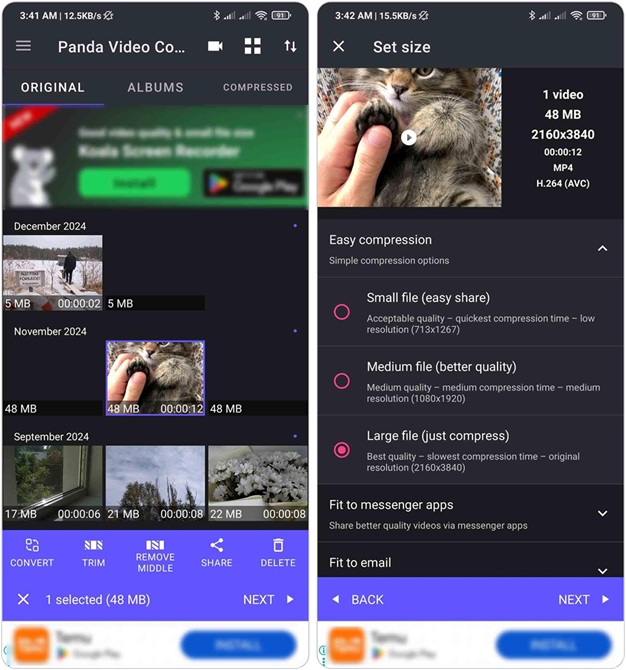
- Download Panda Video Compressor from the Google Play and allow full access to your media files.
- The app immediately displays all your videos, starting with the newest.
- Scroll through, pick the video you want to compress, and tap it. Then hit the Next button at the bottom (it’s not very noticeable).
- You’ll see several compression options: Small File, Medium File, and Large File. Each shows how the choice affects your video. I usually chose Large File so the quality wouldn’t drop too much. Tap Next again.

Panda Video Compressor - The app offers extra actions, like trimming the video or changing the format/codec. I skipped those and just hit Compress.
- The video was processed quickly, and I could download the smaller version right away. One thing to note is that the app doesn’t ask what to do with the original file, so you’ll have to delete it manually if you don’t want duplicates.
Panda Video Compressor Settings That’s about it, Panda Video Compressor is a straightforward solution. It doesn’t wow you with features, but it compresses Android videos reliably and keeps the process simple.

Method 2: Use an Online Video Compressor
So, we figured out how to compress iPhone and Android videos with apps. Now let’s move on to another method I also liked — special online services. They work on the same principle as apps, sometimes even giving you more options to tweak.
I’ll be straight with you, I didn’t spend hours testing dozens of sites. I went with the first service that looked okay, and it worked. Then I clicked through a few others and noticed the steps were pretty much the same everywhere. So here, I’ll just show you the process with Video Compressor as an example.
Here’s how it works:
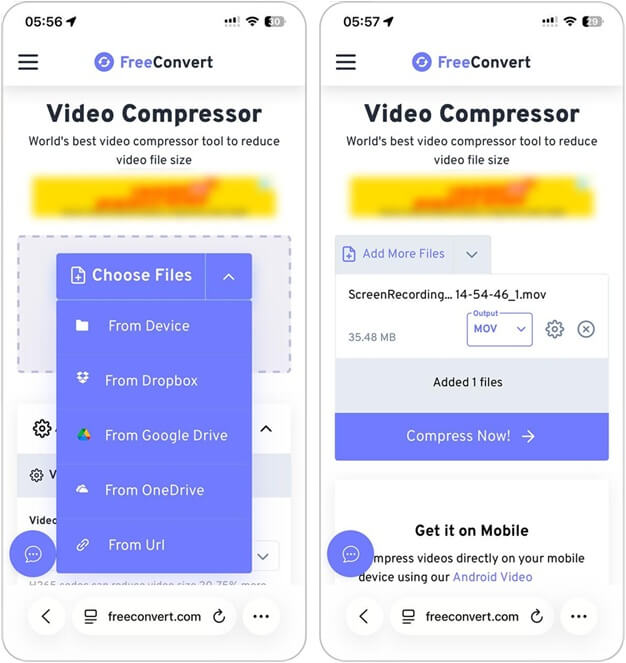
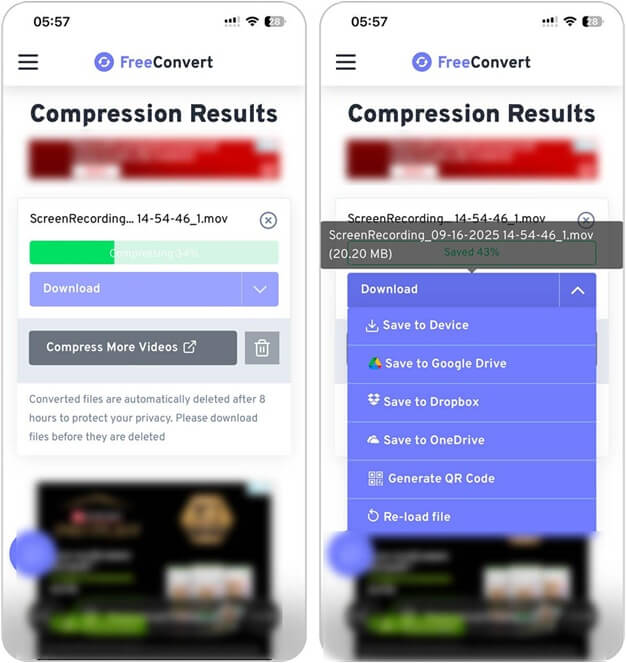
- Open any browser and go to Video Compressor (or a similar site).
- Pick the video you want to make smaller. On iPhone, you can choose it from Photos or Files.
- Select the compression option — usually you’ll see choices like high quality, medium, or small file size.
- Click Compress and give it a moment while the site processes the video.
Free Convert Video Compressor - When it’s done, save the new file back to your phone.
Free Convert: Results
The steps don’t really differ from one service to another. Here and now, I won’t provide separate instructions for Android, because the process is exactly the same there — I just find it more convenient to demonstrate using the iPhone.
Method 3: Send Videos Through Messengers
Another option that turned out to be effective for compressing video on iPhone or Android is simply sending the file through a messenger. Of course, you don’t get to pick the compression level or adjust any settings, so the quality usually drops. Still, if you need a quick solution and don’t care about fine-tuning, this method works.
Here’s how to do it in Telegram:
- Open Telegram and go into the chat where you want to drop the video.
- Tap the paperclip icon and pick Gallery.
- Choose your video. Telegram will shrink it automatically (unless you pick File, which keeps the original size, but here you want Gallery).
- Send it to a friend or to your own Saved Messages. That way you already have a smaller copy.
Compress Images and Videos with Telegram - When the video shows up in the chat, open it, hit the menu (⋯) or the share icon, and save it back.
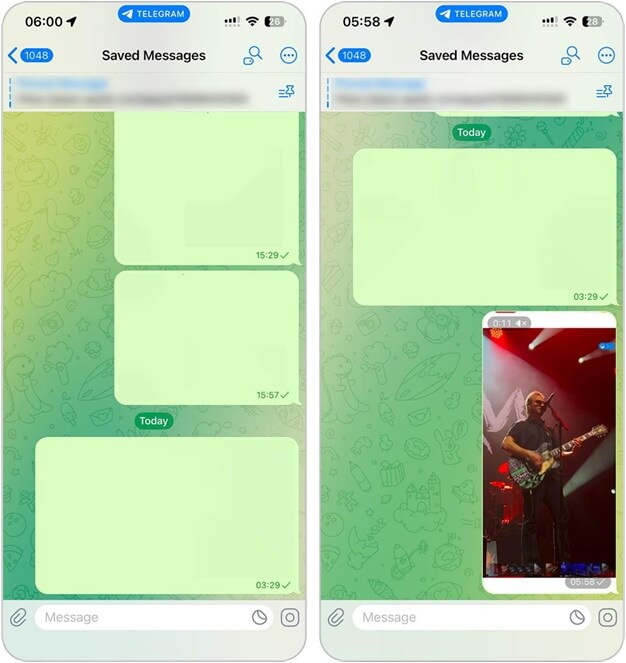
This same principle works in WhatsApp and Viber as well. Once you attach a video, the app compresses it automatically before sending.
Method 4: Use a Computer to Compress Video from an iPhone or Android
The last method I can recommend is to use your computer for video compression. In this case, the tool is HandBrake — a free, open-source program that works on both macOS and Windows. It’s a classic choice among people who often work with video because it lets you control almost everything: resolution, bitrate, codec, frame rate, and so on.
HandBrake handles video compression by re-encoding your file into a smaller version. That means you can take a 4K video that’s several gigabytes and reduce it to a fraction of the size without destroying the quality. But to be honest, this isn’t a method I’d use every day. It feels more like a specialized option for those times when you need to shrink really large files — for example, full-length recordings or long 4K clips.
To illustrate how it works, I’ll explain how to compress a video on a Mac, as that’s more convenient for me. But HandBrake is universal — it’s available for Windows too, and the steps are basically the same:
- Go to the official HandBrake website and grab the version for macOS or Windows. Install it like a regular app.
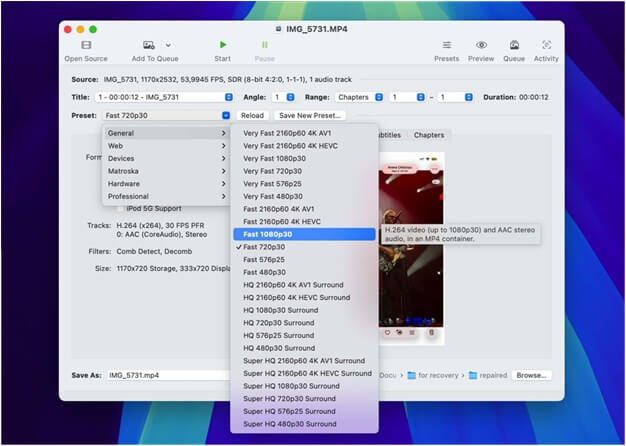
- Open HandBrake, then drag your video into the window or hit Open Source to choose it.
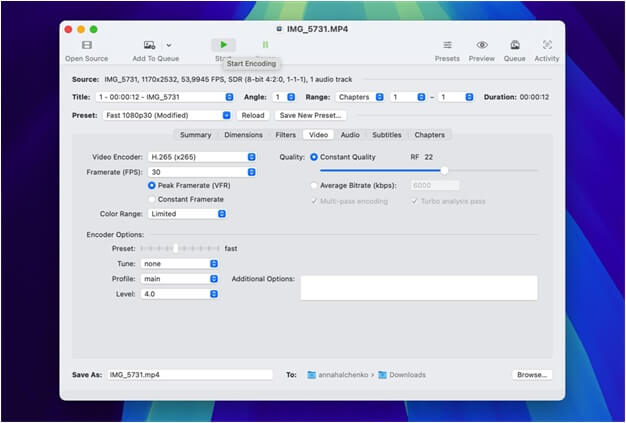
- On the left, you’ll see presets such as Fast 1080p30 or Fast 720p30. Pick one based on how much you want to reduce the file — lower resolution means a smaller size.
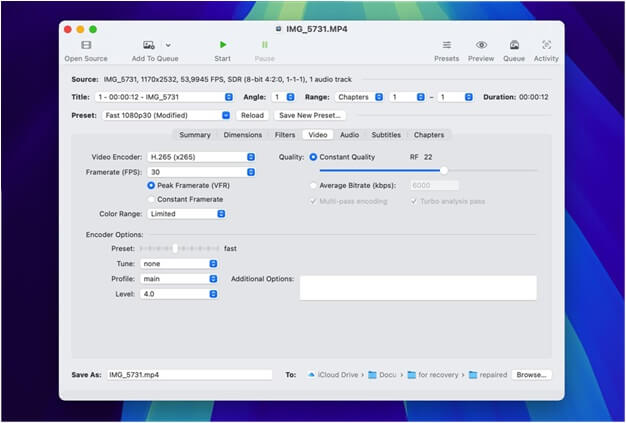
- Go to the Video tab if you want more control:

Video Compression Codec Settings a) Codec: choose H.264 or H.265 (H.265 usually produces smaller files).
b) Quality slider (RF): the lower the number, the higher the quality and the bigger the file. Around 20–22 is a safe middle ground.
c) Frame rate: leave it on the Same as the source unless you plan to lower it.
Compression Settings - At the bottom, set the folder and file name for the new video.
- Press Start. The program will process the video — how long it takes depends on your file size and computer speed.
Start Video Encoding Process - When it finishes, check the new file. In most cases, it will be much lighter but still look nearly identical to the original.

Encoding Result

After optimizing file size, you may also want to clean up overlays—here’s how to remove watermark from video with AI before uploading.
Conclusion
Knowing how to compress videos on iPhone or Android is a genuinely useful skill. It helps save a huge amount of storage space, especially if video is the main type of content you capture. People often suggest just watching and deleting videos, but I don’t agree with that. Videos can hold some of the most important moments — whether it’s something work-related, a vacation with someone special, a proposal, or even a concert you don’t want to forget.
If you’re waiting for my final verdict on the methods, I’d say the most convenient solution for me is using apps like Clever Cleaner on iPhone or Panda Video Compressor on Android. I prefer to have a tool ready on my phone rather than searching for an online service every time. Still, that’s just my take. You might find online compressors easier, or maybe you’ll prefer transferring videos to your computer and running them through HandBrake.
So, look back at the steps I’ve shown you and pick the option that fits your style best. Good luck to you!