Table of Contents
Introduction: The “80% Wall” and Why Your Tablet is Hitting It
It’s one of the most confusing and frustrating “tech” moments you can have.
You plug in your expensive tablet—an iPad, a Samsung Galaxy Tab, or a Microsoft Surface—and leave it to charge overnight. You expect to wake up to that reassuring 100% icon. Instead, you look, and it’s sitting there… stuck. 80%.
It hasn’t moved for hours.
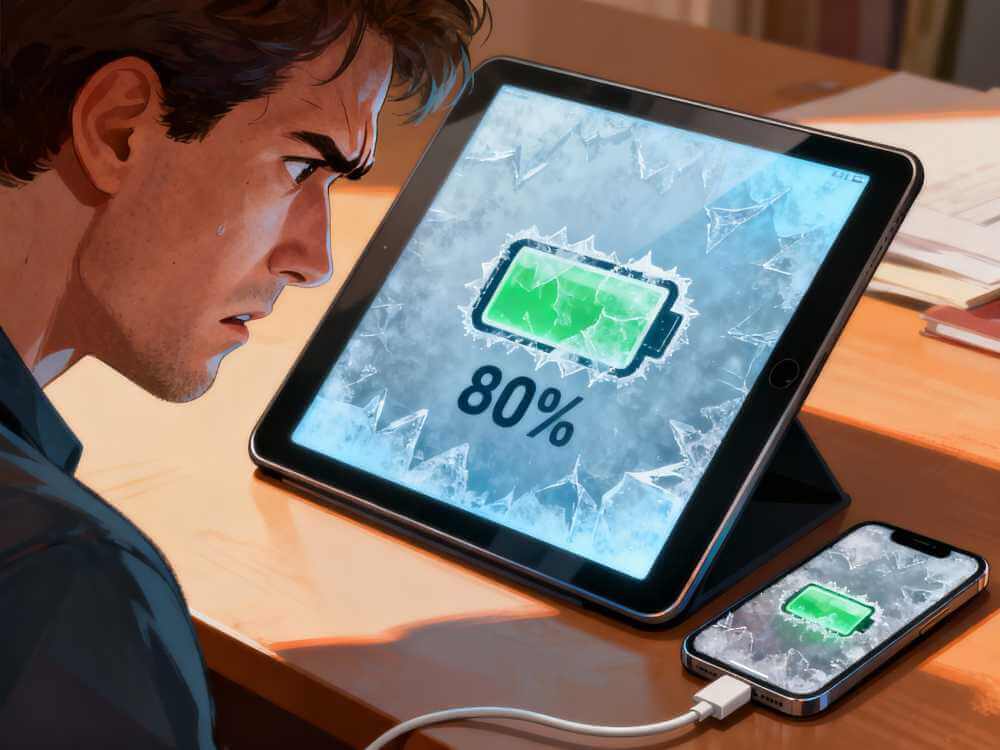
Your first thought is panic. Is the battery dying? Is the charger broken? Is my tablet, a device that costs hundreds (or thousands) of dollars, already failing?
This “80% wall” is baffling. It feels like a bug, but you’re not sure. You unplug it, plug it back in, and still, it stubbornly refuses to go past 80%.
Here’s the good news: In most cases, your tablet is not broken. In fact, it’s often doing exactly what its designers intended, trying to protect itself. But in other cases, it’s the first warning sign of a deeper issue.
In this in-depth guide, we’re going to walk you through the entire diagnostic process. We’ll start with the 60-second “fix” that solves 90% of these cases. Then, we’ll move to the expert-level software tricks, and finally, we’ll explain what’s really happening when it’s a genuine hardware failure.
🧠 Section 1: The Culprit Hiding in Plain Sight: Is It a Feature, Not a Fault?
For the vast majority of modern tablets (especially iPads and newer Samsung models), the reason your tablet won’t charge past 80% is intentional.
This isn’t a bug. It’s a smart battery-health feature.
Why? A Quick Lesson on Battery Science
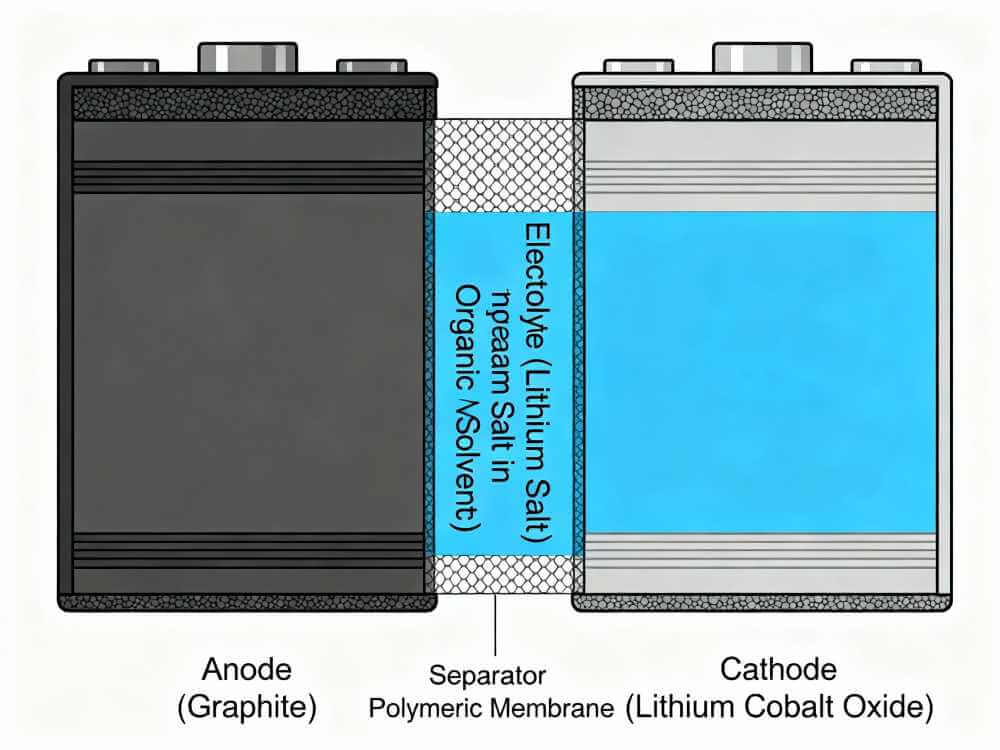
Your tablet uses a Lithium-ion (Li-ion) battery. These batteries are chemical marvels, but they have an enemy: stress. The two biggest forms of stress for a Li-ion battery are:
- Heat: Charging generates heat.
- High Voltage: Sitting at a full 100% charge for long periods (like all night) puts a high-voltage strain on the battery’s chemical components, causing it to degrade much faster.
To make your battery last for years instead of months, Apple, Samsung, and Google all introduced “smart charging” or “optimized charging” features.
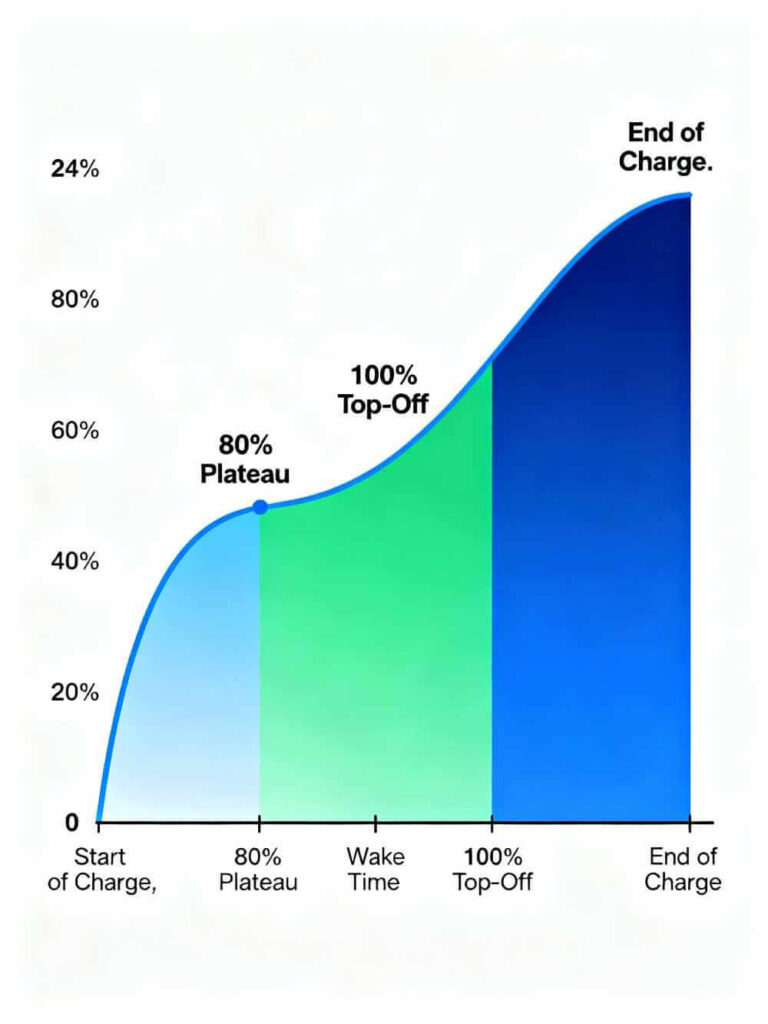
Here’s how it works:
- The tablet learns your daily routine. It knows you wake up around 7 AM.
- It will fast-charge to 80% (which is a “low-stress” state for the battery) and then stop.
- It holds the charge at 80% for most of the night, avoiding heat and high-voltage stress.
- Then, about an hour before you normally wake up, it will “top off” the last 20%, aiming to hit 100% just as your alarm goes off.
This is brilliant for battery longevity… but it’s extremely confusing if you don’t know it’s happening. If you wake up in the middle of the night or have an unusual schedule, you’ll see it “stuck” at 80% and assume it’s broken.
Your First 60-Second Fix: Check These Settings
Before you do anything else, check for this feature.
- For iPads (iOS 11.3 and later):
- Go to Settings > Battery > Battery Health & Charging.
- You will see a setting called “Optimized Battery Charging.”
- If this is ON, this is almost certainly the cause. You can try turning it off, and your iPad should immediately start charging to 100%. (We recommend leaving it on, but this test will confirm the “problem.”)

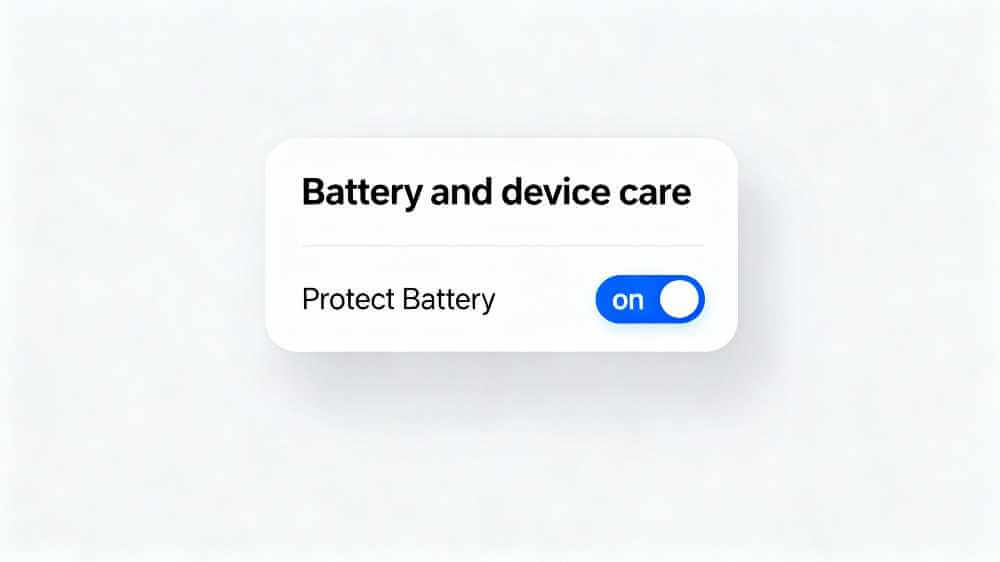
- For Samsung Galaxy Tablets (One UI 3.1 and later):
- Go to Settings > Battery and device care > Battery.
- Tap on “More battery settings.”
- You’ll see a feature called “Protect battery.”
- If this is ON, your tablet is hard-locked to never charge past 85% (Samsung’s number is 85%, Apple’s is 80%). This is not a “smart” learning feature; it’s a permanent cap.
- Turn this off, and your tablet will charge to 100%.
If you checked these settings, turned them off, and your tablet still won’t charge past 80%, then we move on. Now you may have a real issue.
⚙️ Section 2: The Software “Ghost”: When Your Tablet is Lying to You
Okay, so you turned off optimized charging. You plugged your tablet back in. And… still… nothing. It’s still stuck at 80%.
Now we’re in “problem” territory. But it’s likely not a hardware problem yet. It’s a software problem. The “brain” of your tablet—its operating system (OS)—has become confused.
This is a Battery Calibration Error.
Think of it this way: Your tablet’s OS doesn’t have a physical fuel gauge. It estimates the battery percentage by reading voltage levels and tracking power usage over time. It’s a very complex guessing game.
After months of use, tiny errors in this estimation add up. A software update, an app that crashed, or a time you let it die completely can “corrupt” the tablet’s memory of what “full” and “empty” even mean.
Your battery might be at 100%, but the confused software thinks it’s only at 80%. It’s a reporting error. The software is protecting the (already full) battery from “overcharging,” so it cuts the power.
Your DIY Battle Plan: How to Re-Calibrate Your Tablet’s Battery
This is the “deep reset” for your battery’s brain. It’s simple, free, and fixes a huge number of stubborn charging issues. You are basically “re-teaching” the tablet the true empty and full points of its battery.
The Full Battery Calibration Cycle (Do this once a year anyway!)
Note: This process takes time and patience. You can’t rush it. Plan to do it overnight.
- Step 1: The 100% (or 80%) Charge: Plug your tablet in and let it charge to its maximum. In your case, let it charge until it’s “stuck” at 80%. Leave it on the charger for another full hour after it hits that 80% wall.
- Step 2: The Full Drain (The “Empty” Point): Now, you need to drain the battery completely. Don’t just let it sit. Use the tablet. The best way is to play a long YouTube video or stream a movie (with the screen brightness at 100%). You want to run it down until it dies and shuts itself off completely.
- Step 3: The “Ghost” Drain: The tablet shut itself off, but there’s still a tiny bit of “ghost” charge left. Let the tablet sit, dead, for at least 3 to 4 hours (overnight is even better). This ensures it is profoundly empty.
- Step 4: The Uninterrupted “Full” Charge: This is the most critical step. Plug your tablet back in using its original, high-quality charger. Let it charge all the way to 100% (which it should do now that it’s been reset) without interruption. Do not turn it on to check. Do not unplug it.
- Step 5: The “Soak” Charge: Once it hits 100%, leave it plugged in for another 2 full hours. This is called a “trickle” or “soak” charge, and it ensures the battery is truly at its maximum capacity.
- Step 6: The Final Restart: After it’s been at 100% for 2 hours, unplug it. Turn it on. If it’s not on already, turn it on and then perform a simple restart (turn it off and on again).

This 6-step process resets the software’s battery-tracking data. For a vast number of “stuck at 80%” issues, this will solve it completely.
🛠️ Section 3: The Hardware: When It’s a Genuine “Broken” Part
You did the calibration. You restarted your tablet. And it still only charges to 80%… or maybe it’s charging slowly, or the percentage jumps around wildly (e.g., 80% to 50% in a minute).
We are now leaving the world of software glitches and entering the world of hardware failure. No software trick will fix a physically broken component.
As repair experts, this is what we see every day. The problem usually lies in one of three places:
1. The Battery Itself (The Most Likely Culprit)
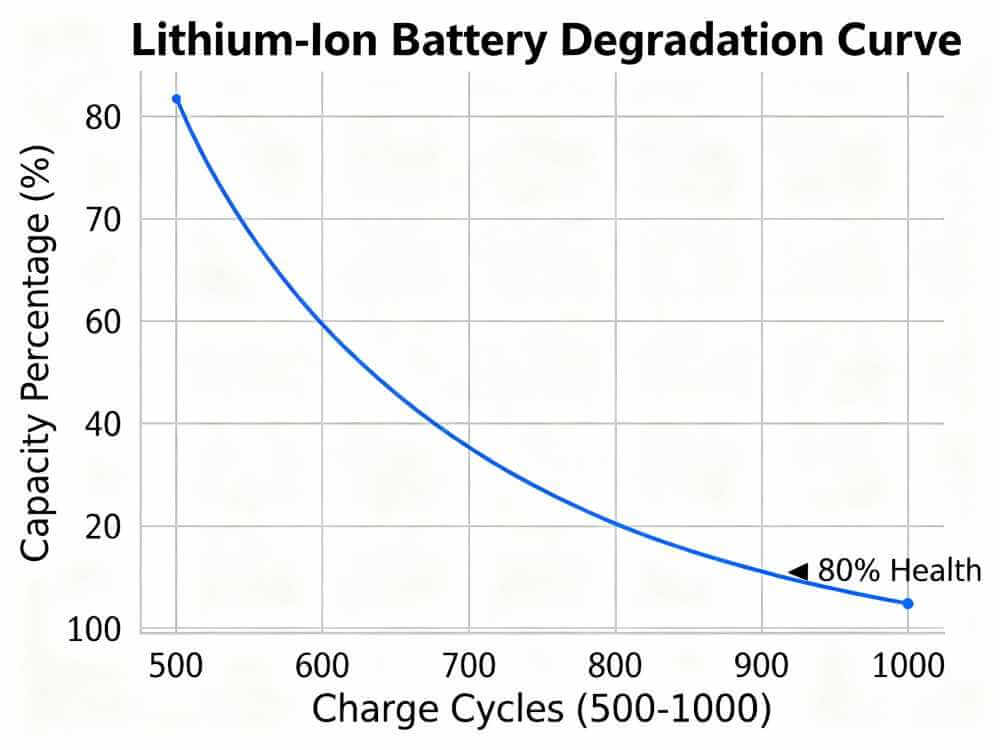
Your tablet’s battery is a consumable part. It is a small chemical factory that wears out with every single charge cycle. The average Li-ion battery is designed to hold about 80% of its original capacity after 500-1000 charge cycles (about 2-3 years of heavy use).
When a battery gets old, its internal chemistry changes.
- It can’t hold as much charge as it used to (its “full” is now much lower).
- Its internal resistance goes up, which means it generates more heat when charging.
- Your tablet’s internal sensors are smart. They detect this extra heat and the high internal resistance. They correctly identify the battery as “old and potentially dangerous.”
- As a safety precaution, the charging circuitry throts charging or stops it at 80% to prevent the old, stressed battery from overheating, swelling, or (in extreme cases) catching fire.
That 80% wall isn’t a software bug anymore. It’s a physical safety warning.
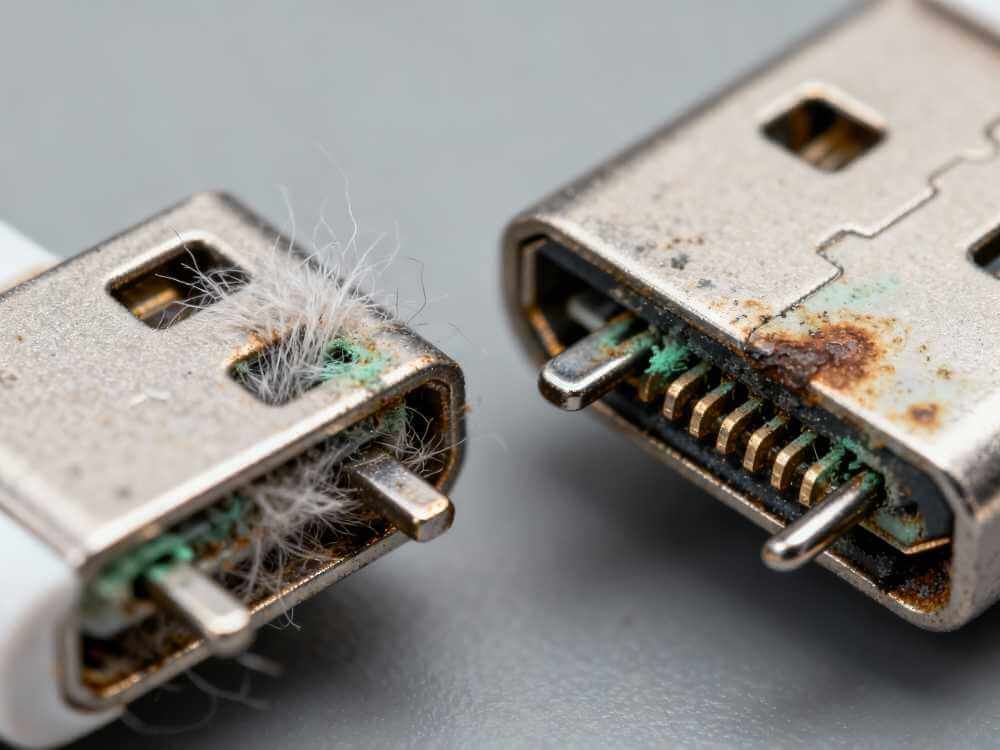
2. The Charging Port (The “Wiggle” Problem)
Look at your charging port. Is it full of lint? Does the cable feel “mushy” or “loose” when you plug it in? Do you have to “wiggle” the cord to get it to charge?
The charging port is the single most high-traffic physical part of your tablet. It gets plugged and unplugged hundreds of times. Lint from your bag or pocket gets packed into the back. The tiny metal pins inside get bent, corroded, or broken.
A damaged port can create a “dirty” or “weak” electrical connection. The tablet gets some power (enough to charge slowly), but not a clean, full-power signal. The charging management chip (another “brain”) gets confusing data from this weak connection and, to be safe, it cuts the charge off early.
3. The Charging “IC” Chip (The “Brain” Failure)
This is the least common but most serious problem. On your tablet’s main logic board, there is a tiny microchip called a Charging IC (Integrated Circuit). This is the real brain of the charging system. It’s the traffic cop that talks to the charger, the battery, and the OS.
This chip can be damaged by:
- Using cheap, uncertified, or counterfeit chargers (a major cause).
- A bad power surge.
- A hard drop, even one that didn’t crack the screen.
When this chip is “fried,” all bets are off. It gives the OS garbage data. It might tell the battery it’s full when it’s empty. It might not send any power at all. Or, it might get stuck in a loop, only allowing a “safe mode” charge up to 80%.
If your tablet is stuck at 80% and it gets unusually hot near the charging port and you’ve tried different chargers, a faulty IC is a strong possibility.
👨⚕️ Section 4: What Repair Experts Do (The Professional Fix)
You’ve hit the wall. You’ve tried the settings, the calibration, and different chargers. The problem is clearly hardware. This is not a DIY fix.
Opening a modern tablet is like surgery. They are sealed shut with powerful adhesives, filled with delicate ribbon cables, and one wrong move can destroy the screen or the logic board.
When you bring a tablet to us, we follow a professional diagnostic process that you simply can’t do at home.
- Software & Port-Level Diagnostics: Before we ever open the device, we plug it into our diagnostic computer. We have software that can read the direct data from the charging chip and battery sensor. It tells us the battery’s true “cycle count,” its real-time temperature, and its “design capacity” vs. “current capacity.” This data tells us instantly if the battery is the problem.
- Physical Inspection & Cleaning: We use specialized tools and microscopes to inspect the charging port. We can see bent pins or corrosion invisible to the naked eye. Often, a “deep” professional cleaning of the port (which is very different from blowing air into it) can fix the issue.
- The Battery Replacement: If the diagnostics point to a worn-out battery, the fix is to replace it. This is a delicate process that involves heating the tablet to soften the adhesive, carefully prying the screen off (without cracking it), and un-sealing the old battery (which is glued to the tablet’s frame). We install a new, A-grade battery, re-seal the device, and run it through a full test cycle.
- Microsoldering (For IC/Port Repair): If the battery and port are good, the logic board is the final culprit. This is where true experts come in. We are a shop that has microsoldering technicians. This means we can use a microscope and high-precision tools to de-solder the tiny, broken charging port or IC chip from the logic board and solder a brand new one in its place. This is a board-level repair that saves the entire device from being e-waste.
Section 5: Conclusion: Your Final Action Plan
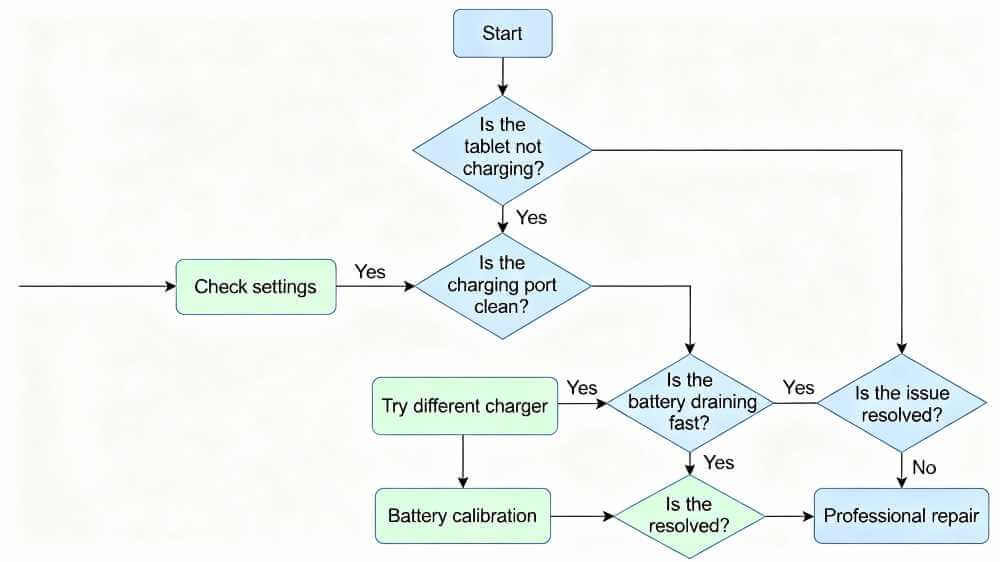
If your tablet won’t charge past 80%, don’t panic. Follow this simple plan.
Step 1: The Feature Check. Go to Settings > Battery and look for “Optimized Charging” (iOS) or “Protect battery” (Samsung/Android). Turn it off as a test. This solves 90% of cases.
Step 2: The Hardware Check. Try a different, high-quality charging brick and a different charging cable. A bad cable is a common and cheap-to-fix problem.
Step 3: The Software Fix. If it still won’t charge, perform the Full Battery Calibration Cycle (charge, drain, wait, recharge). This fixes “confused” software.
Step 4: The Expert Fix. If none of the above works, stop. The problem is physical hardware. You’re dealing with a worn-out battery, a damaged port, or a fried logic board chip. Further DIY attempts will only risk more damage. It’s time to bring it to a professional who can diagnose it properly and give you a real, safe repair.
Frequently Asked Questions (FAQs): Firmware, Battery Calibration & What Repair Experts Do
Q1: Is it bad to leave “Optimized Battery Charging” on?
A: No, it is excellent for your battery. We highly recommend you leave it ON. It will dramatically extend the lifespan of your battery. The 80% “stuck” point is just part of how it works. You only need to turn it off temporarily if you need a 100% charge right now for a long flight.
Q2: Will my tablet “explode” if it’s stuck at 80%?
A: If the 80% stop is because of a feature (Optimized Charging), it’s 100% safe. If it’s because of an old, degraded battery, the 80% stop is a safety mechanism preventing a worse problem. The battery itself is the risk, and the 80% stop is the symptom. You should get that battery replaced.
Q3: How much does it cost to fix this?
A: It depends entirely on the cause. A port cleaning is very inexpensive. A battery replacement is a standard, moderately-priced repair. A logic board microsoldering repair is the most complex and expensive, but it’s still far cheaper than buying a new high-end tablet.
Q4: Can I just keep using my tablet if it only charges to 80%?
A: If it’s a software or battery-health feature, yes, absolutely. If it’s a hardware fault (like a bad battery or port), you’re on borrowed time. The problem will only get worse. It will go from 80% to 60%, and then one day, it won’t charge at all. It’s always better to fix it before that day comes.
Disclaimer
The information provided in this blog post is for educational and informational purposes only and does not constitute professional technical advice. While we have made every effort to ensure the accuracy of these instructions, proceeding with steps like battery calibration or modifying system settings carries a risk.
Always back up your device completely before attempting any major software changes. Do not attempt to open your tablet or replace the battery yourself; this is dangerous and can result in fire, injury, or permanent damage to your device. For all hardware issues, please consult a professional technician.