You saw the little red “1” on your Settings icon. You felt that tiny spark of excitement: a new update! New features, better security, and a fresh feel for your phone. You tapped “Download and Install,” plugged in your phone, and walked away.
But when you came back, your excitement turned to ice. Instead of a new lock screen, you’re staring at an error message: “Unable to Install Update.”
Or maybe it’s worse. Maybe your phone is now stuck in an endless loop, flashing the Apple or Samsung logo over and over, never fully turning on.
A failed Over-The-Air (OTA) update is one of the most frightening things that can happen to your device. It feels like you did everything right, but your phone—your connection to the world—is now a very expensive brick. This is a common and terrifying problem, but in most cases, it is absolutely fixable.
Before you consider giving up and buying a new device, it’s critical to understand what’s really happening inside your phone. Why did it fail? What can you do about it? And when is it a sign of a much deeper problem that needs an expert’s touch?
Table of Contents
What Exactly Is an OTA Update? (And Why Is It So Delicate?)
Think of an OTA update as performing open-heart surgery on your phone’s brain—its operating system (OS).
“Over-The-Air” simply means the update file is delivered to your phone wirelessly, via Wi-Fi or cellular data, rather than being “cabled in” from a computer.
Here’s the high-stakes, five-step process that happens when you tap “Install”:
- Download: Your phone downloads a massive, heavily encrypted file (often 3-6GB) from Apple or Google’s servers.
- Verification: Your phone meticulously checks this entire file. It runs a digital “checksum” to ensure not a single 1 or 0 was corrupted during the download. If it finds even one tiny error, it stops. This is “Verifying Update…”
- Preparation: The phone “unpacks” the update and needs a large, temporary “staging area” on its hard drive to do this.
- Installation: The phone reboots into a special installation mode. It begins carefully rewriting the core files of its operating system, swapping old files for new ones.
- Reboot & Clean-up: The phone boots up on the new OS for the first time, finalizes the new files, and deletes the temporary installation package.
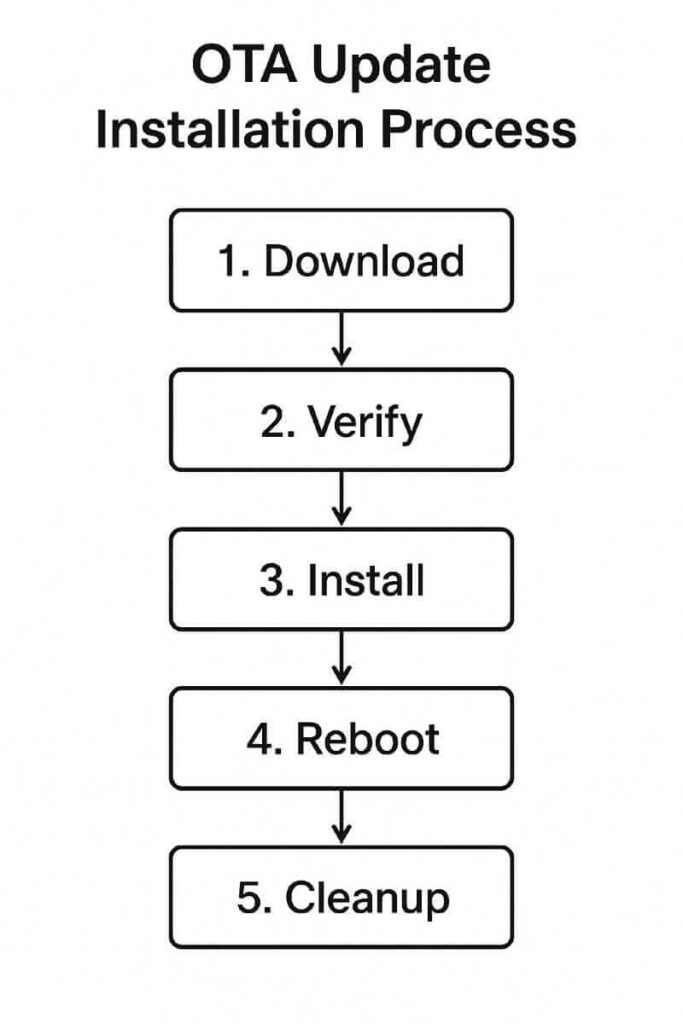
As you can see, this is an incredibly complex and fragile dance. For it to succeed, everything has to be perfect. A failure at any one of these steps will result in an error message or, worse, a “soft-bricked” device.
The “Big 3” Reasons It Fails (The At-Home Fixes)
Before you panic, let’s rule out the three most common—and 100% user-fixable—causes for a failed update. More than 70% of the failures we see are caused by one of these simple, overlooked issues.
Reason 1: Not Enough Storage Space
This is, without a doubt, the #1 culprit. Your phone might say it’s a 3GB update, but it doesn’t just need 3GB of free space.
Think of it like building a piece of IKEA furniture. You don’t just need space for the final bookshelf; you need a big, open area on your living room floor to lay out all the pieces, read the instructions, and assemble it.
Your phone needs space for:
- The downloaded 3GB file.
- The 5-7GB of temporary unpacked files.
- A “buffer” of 1-2GB for the OS to run while it does all this.
The Fix: Your phone’s OS is often too optimistic about how much space it needs. As a rule of thumb, you should have at least 10-15GB of free space before attempting a major OS update.
- How to Check:
- iPhone: Go to Settings > General > iPhone Storage.
- Android: Go to Settings > Storage.
- How to Clean:
- Offload Apps: Delete apps you haven’t used in months.
- Clear Caches: Your “Other” or “System Data” is full of caches. Deleting and reinstalling social media apps (like TikTok or Instagram) is a fast way to clear this.
- Move Photos & Videos: This is the big one. Back up your photos to a computer or cloud service (iCloud, Google Photos) and then delete them from your device.
Once you’ve cleared space, try the update again.
Reason 2: A Bad Download or Unstable Wi-Fi
That 3-6GB file is traveling a long way. If your Wi-Fi blips for even a half-second, it can corrupt the download. When your phone gets to the “Verification” step, it will find this error, stop, and give you an “Unable to Verify” error.
It’s not your phone that’s broken; it’s the file that’s broken.
The Fix: You need to delete the bad file and download a fresh, clean copy.
- Delete the Bad Update:
- iPhone: Go to Settings > General > iPhone Storage. Look through the list for the iOS update file (it will have the Settings icon). Tap it, then tap “Delete Update.”
- Android: Go to Settings > Apps > Show system apps (you may need to tap the 3-dot menu). Find “System Update” and Clear Cache and Clear Data.
- Refresh Your Connection:
- Go to Settings > Wi-Fi, tap on your network, and select “Forget This Network.”
- Reboot your phone.
- Reconnect to your Wi-Fi network (preferably one that is fast and stable).
- Try Again: Go back to Settings > General > Software Update and re-download the update from scratch.
Reason 3: Low or Failing Battery
This is a built-in safety measure. The “Installation” part of the update is the point of no return. If your phone’s battery were to die during that process, the OS would be left half-installed and 100% corrupted. This is a primary cause of a “bricked” phone.
To prevent this, your phone simply will not start the installation unless it meets two conditions:
- It is connected to a charger.
- The battery is charged to at least 50% (sometimes 80%).
But here’s the “pro tip”: If your battery’s health is low (you can check in Settings > Battery > Battery Health on an iPhone), your phone might think it has 60% charge, but the battery management system knows that 60% is weak and might not last. It will refuse to start the update to protect itself.
The Fix:
- Plug your phone into a wall charger (not a slow computer USB port).
- Let it charge for at least one full hour before you tap “Install.”
- If it still fails, your battery itself might be the component that’s failing, and the update is just the first thing to reveal the problem.
When It Gets Serious: The “Soft-Brick” & The Boot Loop
Okay, so you’ve tried the “Big 3” fixes, and it’s still not working. Or worse, your phone is now in a state of limbo. This is where we move from “DIY” to “Caution.”
Symptom 1: Stuck on “Verifying Update…” or “Preparing Update…”
Your phone has the file, but it’s “thinking” itself into a loop. It’s stuck in the verification or preparation phase. It’s not frozen—you can still go to your home screen—but the update will never, ever start.
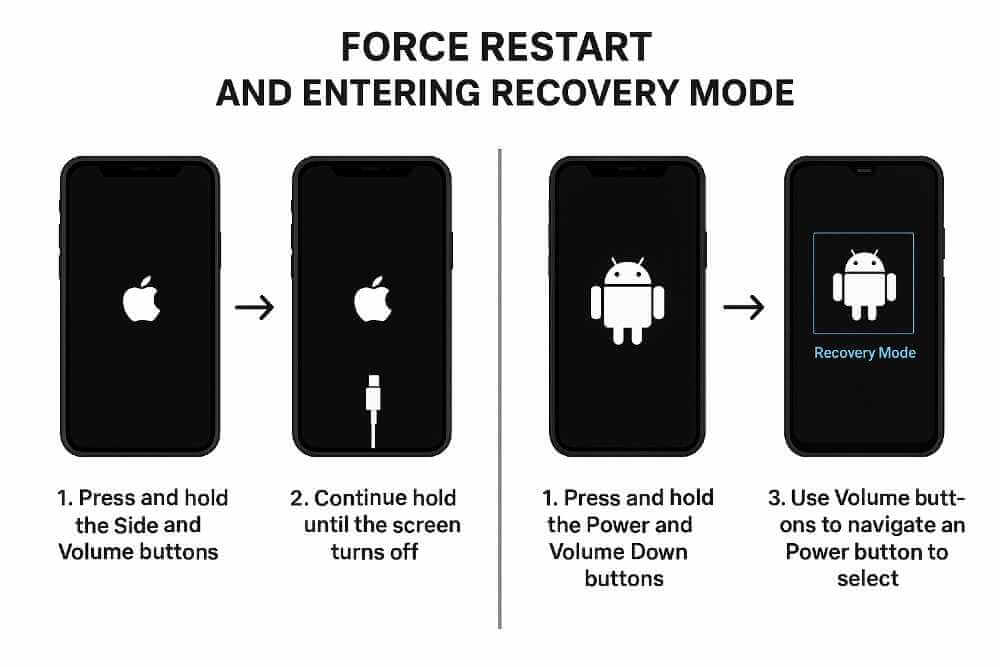
The Fix: The Force Restart This is the electronic equivalent of a “slap on the back.” It won’t erase your data, but it will jolt the phone out of its stuck process.
- On a modern iPhone (X or newer): Quickly press and release the Volume Up button. Quickly press and release the Volume Down button. Then, press and hold the side (power) button. Keep holding it, past the “Slide to Power Off” screen, until you see the Apple logo.
- On most Android phones: Press and hold the Power button and the Volume Down button simultaneously for about 10-15 seconds until the phone reboots.
After the phone restarts, try the update process one more time (after checking your storage and Wi-Fi).
Symptom 2: The Dreaded Boot Loop (Stuck on the Logo)
This is the most serious symptom. You see the Apple or Samsung logo, it hangs there for a few minutes, the screen goes black, and the logo appears again. And again. And again.
What This Means: The update started the installation (Step 4) but failed in the middle. Your operating system is now critically corrupted. It’s “half-old” and “half-new,” and it doesn’t know how to turn on.
The Fix: Recovery Mode (The “ER” for your Phone) This is your last-ditch effort before you need a pro. Recovery Mode is a special, pre-OS menu that lets you try to repair the phone with a computer.
- On an iPhone: You’ll need a Mac with Finder or a PC with iTunes. Connect your phone with a cable. Then, perform a Force Restart (as described above) but DO NOT let go of the side button when you see the Apple logo. Keep holding until you see a screen with a computer and a cable.
- On an Android: The button combo varies, but it’s usually holding Power + Volume Up (or Down) while the phone is off.
Your computer will pop up with a message: “There is a problem with the [iPhone/Android] that requires it to be updated or restored.”
You will have two choices: “Update” or “Restore.”
ALWAYS CHOOSE “UPDATE” FIRST.
- “Update” will try to re-install the entire operating system without erasing your photos, apps, and data. This is exactly what you want.
- “Restore“ is the “nuclear option.” It will wipe your phone completely and install a fresh copy of the OS. You will lose everything that wasn’t backed up.
If the “Update” option fails, you are now in dangerous territory. This is the point to stop and call a professional. One wrong click in this mode can be the difference between saving your data and losing it forever. For a complex, high-stakes data-recovery situation like this, you need an Android repair (or iOS) specialist who has done this hundreds of times.
When the Failed Update Is a Red Flag for a Deeper Problem
You’ve tried everything. The simple fixes failed. The Recovery Mode “Update” also failed.
What does this mean? It means the update was never the problem in the first place. The failed update was just the symptom of a deeper, pre-existing hardware failure.
Your phone was a ticking time bomb, and the update was just the first thing to set it off.
Hidden Problem 1: Failing NAND (The “Hard Drive”)

This is the scariest—and most common—hidden failure. The NAND is your phone’s storage chip. It’s where your photos, your apps, and your OS all live. These chips have a finite lifespan. They can and do wear out.
As they age, they develop “bad sectors”—like potholes on a highway. Your phone is smart enough to “drive around” these potholes during normal use, so you may not even notice.
But an OS installation is not normal use. It needs to write gigabytes of data to every part of the drive. When it hits one of these “potholes,” the installation fails.
- Signs this might be you: In the weeks leading up to this, your phone was probably acting weird. Apps crashing, running very slow, taking blurry photos, or randomly restarting.
- The Pro Fix: This is not a software issue. We have to use specialized hardware diagnostic tools to read the health of the NAND chip. In some cases, this requires micro-soldering to repair the chip’s connection or (in extreme data recovery cases) removing the chip entirely.
Hidden Problem 2: Modified Software (Jailbreak / Root)
If you or a previous owner ever “jailbroke” (iPhone) or “rooted” (Android) the phone, you have modified the core OS files.
When the OTA update comes, it scans the OS and sees files that aren’t supposed to be there. It panics, thinking it’s a virus or major corruption, and shuts down the installation, often bricking the phone in the process.
- The Pro Fix: We can’t just “Update.” We have to manually “flash” a brand-new, stock firmware file onto the phone, which completely erases the modified software (and everything else) to get it back to a factory state.
Hidden Problem 3: A Previous, Bad Repair
Did you get your screen or battery replaced at a “too-good-to-be-true” cheap kiosk a year ago? This could be the cause.
Modern phones “serialize” their parts. The logic board is paired with the screen, the battery, and the camera. If you use a cheap, non-genuine part, the phone knows. A major OS update often includes new firmware for these other parts. When the update tries to talk to the non-genuine screen and gets a “Who are you?” response, it fails the entire update.
- The Pro Fix: We have to physically open the device and diagnose which non-genuine part is causing the conflict.
Conclusion: Stop Guessing and Get an Expert Diagnosis
A failed OTA update can be a simple 10-minute fix or it can be a symptom of a critical hardware failure. The problem is, they both look exactly the same from the outside.
You can spend hours trying to fix it yourself, getting more and more frustrated, and inching closer to that terrifying “Restore” button that will wipe all your memories.
Don’t gamble with your data.
If the simple fixes (storage, Wi-Fi, force restart) don’t work, stop. Don’t try to be a hero. Bring your device to a professional. We have the software, the tools, and the experience to safely diagnose the real problem. We can often use the “Update” function in our pro-level tools when the public version fails. And if it is a hardware problem, we can tell you for sure.
For a fast, safe, and reliable diagnosis, trust your device to a expert. We can turn that “bricked” feeling back into the relief of a fully-working phone.
Frequently Asked Questions (FAQs)
Q1: Will a failed update delete my photos and data?
A1: A failed update by itself does not delete your data. Your data is still on the phone. The danger is that the only way to fix the failure might be a “Restore,” which does delete everything. This is why you must try the “Update” option in Recovery Mode first, and if that fails, bring it to a pro who has other, non-destructive methods.
Q2: Is it safe to just ignore the update forever?
A2: This is an extremely bad idea. 90% of OS updates are not about new emojis; they are about critical security patches. Hackers and viruses specifically target phones that are running on old, un-patched software. By not updating, you are leaving your digital front door wide open.
Q3: My phone is really hot and the battery is draining fast while “Preparing Update.” Is that normal?
A3: Yes, to an extent. The “Verification” and “Preparation” steps are the most processor-intensive part of the process. Your phone’s “brain” is running a marathon. It’s normal for it to get very warm. However, if it becomes painfully hot to the touch, that could be a sign of a failing battery or a logic board issue that is causing the update to fail.
Disclaimer
The information provided in this article is for informational and educational purposes only. The diagnostic steps, troubleshooting advice, and potential causes described are based on common issues seen by repair professionals.
This content is not a substitute for a professional diagnosis by a qualified technician. Attempting to fix your device, especially by using advanced modes like Recovery Mode or DFU Mode, is done entirely at your own risk. One incorrect click or an interrupted installation can lead to permanent data loss or render your device inoperable.
We assume no liability for any damage to your device, loss of data, or any personal injury that may occur as a result of following any information provided in this post. When in doubt, please consult a professional.